
User guide

Xenus Plus User Guide Thermal Considerations
Copley Controls 138
C.3: Heatsink Mounting Instructions (XE2/XP2/800-
1782/800-1808)
description
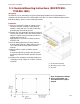
The XE2-HK is a kit containing a heatsink and mounting hardware for field installation of a
standard heatsink onto Xenus Plus XE2 model servo drive. To order an XE2 drive with heatsink
fitted at the factory, add “-H” to the model part number.
installation
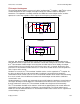
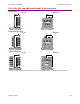
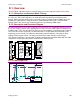
1) Place the heatsink fins-down on a work surface.
Orient the heatsink so that the edge with part
number is away from you. The hole for the XE2
grounding lug should be to your left.
2) Remove the clear protective film from the thermal
material and discard it. Place the thermal material
onto the heatsink in the placement area which is
marked with four white “L”.
Apply light pressure to ensure that the thermal
material is flat.
3) Peel the white protective layer away from the
thermal material. Do this slowly from one corner
so as not to lift the thermal material from the
heatsink.
4) Align the XE2 as shown and lower onto the
heatsink.
If needed to adjust the position, lift it away from
the thermal material and lower onto the heatsink
again.
5) Install the four mounting screws with flat washers
and tighten evenly. Torque to 17.8 lb-in (2.0 Nm)
maximum.
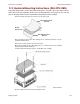
Note: If alignment markings
are not on heatsink, use
these dimensions to place
the pad
(1) Thermal material (TM)
(2) Mounting position of TM
(3) Heatsink