
User guide

Thermal Considerations Xenus XTL User Guide
154 Copley Controls Corp.
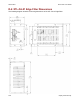
C.2: Heatsink Mounting Instructions
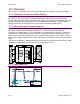
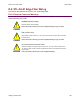
A dry film interface pad is used in place of thermal grease. The pad is die-cut to
shape and has holes for the heat sink mounting screws. There are two protective sheets, blue on
one side and clear on the other. Both must be removed when the interface pad is installed.
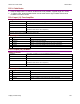
C.2.1 Remove the blue protective sheet from one side of the pad.
Blue Protective Sheet
(Discard)
Dry Film
Interface Pad
Clear Protective Sheet
(Discard)
C.2.2 Place the interface pad on the amplifier, taking care to center the pad holes over the
heatsink mounting holes.
C.2.3 Remove the clear protective sheet from the pad.
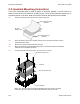
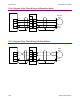
C.2.4 Mount the heatsink onto the amplifier taking care to see that the holes in the heatsink,
interface pad, and amplifier all line up.
C.2.4 Torque the #6-32 mounting screws to 8~10 lb-in (0.9~1.13 Nm).
#6-32 Mounting Screws
Xenus Amplifier
Transparent Carrier
(Discard)
Phase Change Material
Heatsink
Dry Film Interface Pad
NOTE: The drawing shows the standard heatsink kit (XTL-HS), but the mounting
instructions given are valid for the low profile heatsink kit (XTL-HL) as well.