user manual
Table Of Contents
- Introduction
- Parts of the Camera and Basic Operation
- Basic Steps for Shooting and Playback
- Shooting Features
- Auto Mode
- Scene Mode (Shooting Suited to Scenes)
- Special Effects Mode (Applying Effects When Shooting)
- Smart Portrait Mode (Capturing Images of Smiling Faces)
- Features That Can Be Set Using the Multi Selector
- Changing the Image Size (Image Mode)
- Functions That Cannot Be Applied Simultaneously
- Face Detection
- Skin Softening
- Focus Lock
- Playback Features
- Recording and Playing Back Movies
- General Camera Setup
- Reference Section
- Using Panorama Assist
- Favorite Pictures Mode
- Auto Sort Mode
- List by Date Mode
- Editing Images (Still Images)
- Editing Functions
- Quick Retouch: Enhancing Contrast and Saturation
- D-Lighting: Enhancing Brightness and Contrast
- Glamour Retouch: Softening Skin and Making Faces Looking Smaller with Larger Eyes
- Filter Effects: Applying Digital Filter Effects
- Small Picture: Reducing Image Size
- Crop: Creating a Cropped Copy
- Connecting the Camera to a TV (Playback on a TV)
- Connecting the Camera to a Printer (Direct Print)
- The Shooting Menu (for Auto Mode)
- Smart Portrait Menu
- The Playback Menu
- The Movie Menu
- The Setup Menu
- Image/Sound File and Folder Names
- Optional Accessories
- Error Messages
- Technical Notes and Index

55
Features That Can Be Set Using the Multi Selector
Shooting Features
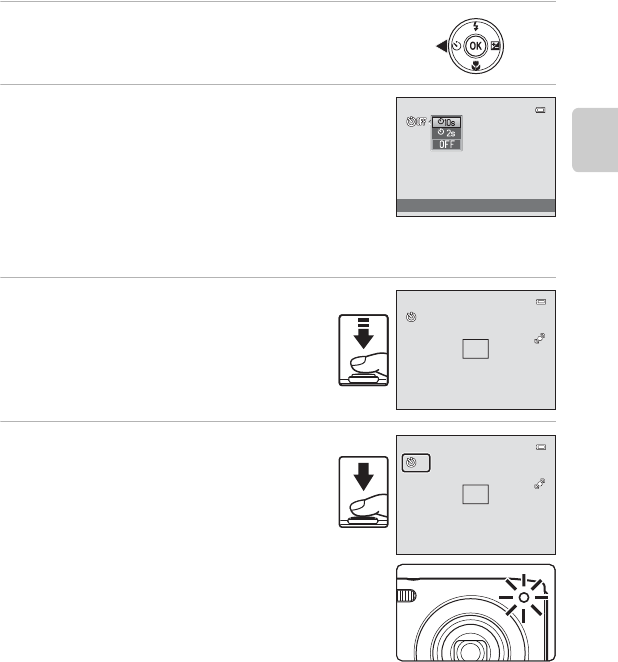
Using the Self-timer
The camera is equipped with a self-timer that releases the shutter ten seconds or
two seconds after you press the shutter-release button. The self-timer is useful
when you want to be in the picture you are taking, and when you want to avoid
the effects of camera shake that occur when you press the shutter-release button.
When using the self-timer, use of a tripod is recommended.
1 Press the multi selector J (n self-timer).
2 Press the multi selector H or I to choose
n10s or n2s and press the k button.
• n10s (ten seconds): Use on important occasions, such
as weddings
• n2s (two seconds): Use to prevent camera shake
• If a setting is not applied by pressing the k button
within a few seconds, the selection will be canceled.
• When the shooting mode is set to Pet portrait scene mode, Y (Pet portrait auto
release) is displayed (A46). The self-timer settings n10s and n2s cannot be used.
3 Frame the picture and press the
shutter-release button halfway.
• Focus and exposure will be set.
4 Press the shutter-release button the
rest of the way down.
• The self-timer starts, and the number of
seconds remaining before the shutter is
released is displayed in the monitor. The self-
timer lamp flashes while the timer is counting
down. About one second before the shutter
is released, the lamp stops flashing and glows
steadily.
• When the shutter is released, the self-timer
will be set to OFF.
• To stop the timer before a picture is taken,
press the shutter-release button again.
Self-timer
F 3.5
F 3.5
1 / 2 5 0
1/250
10
10
F 3.5
F 3.5
1 / 2 5 0
1/250
9
9


