
user manual
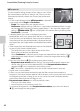

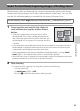
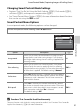
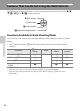
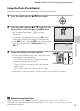
Table Of Contents
- Introduction
- Parts of the Camera and Basic Operation
- Basic Steps for Shooting and Playback
- Shooting Features
- Auto Mode
- Scene Mode (Shooting Suited to Scenes)
- Special Effects Mode (Applying Effects When Shooting)
- Smart Portrait Mode (Capturing Images of Smiling Faces)
- Features That Can Be Set Using the Multi Selector
- Changing the Image Size (Image Mode)
- Functions That Cannot Be Applied Simultaneously
- Face Detection
- Skin Softening
- Focus Lock
- Playback Features
- Recording and Playing Back Movies
- General Camera Setup
- Reference Section
- Using Panorama Assist
- Favorite Pictures Mode
- Auto Sort Mode
- List by Date Mode
- Editing Images (Still Images)
- Editing Functions
- Quick Retouch: Enhancing Contrast and Saturation
- D-Lighting: Enhancing Brightness and Contrast
- Glamour Retouch: Softening Skin and Making Faces Looking Smaller with Larger Eyes
- Filter Effects: Applying Digital Filter Effects
- Small Picture: Reducing Image Size
- Crop: Creating a Cropped Copy
- Connecting the Camera to a TV (Playback on a TV)
- Connecting the Camera to a Printer (Direct Print)
- The Shooting Menu (for Auto Mode)
- Smart Portrait Menu
- The Playback Menu
- The Movie Menu
- The Setup Menu
- Image/Sound File and Folder Names
- Optional Accessories
- Error Messages
- Technical Notes and Index

54
Features That Can Be Set Using the Multi Selector
Shooting Features
Available Flash Modes
C The Flash Mode Setting
• The default flash mode setting varies with shooting mode. See “Default Settings” (A58) and
“Functions Available for Each Shooting Mode” (A52) for more information.
• Some flash settings cannot be used with other functions. See “Functions That Cannot Be Applied
Simultaneously” (A62) for more information.
• The flash mode setting applied in A (auto) mode is stored in the camera’s memory even after the
camera is turned off.
C Red-eye Reduction
This camera uses advanced red-eye reduction (“In-Camera Red-Eye Fix”).
If the camera detects “red eye” while saving an image, the affected area will be processed to reduce
red-eye before the image is saved.
Note the following when shooting:
• More time than usual is required to save images.
• Red-eye reduction may not produce the desired results in some situations.
• In extremely rare instances, areas not subject to red-eye may be affected by red-eye reduction
processing; in these cases, choose another flash mode and try again.
U Auto
Flash fires automatically when lighting is dim.
V Auto with red-eye reduction
Suited to pictures of people. This option reduces the “red-eye” phenomenon that
caused by the use of flash.
W Off
Flash will not fire even when lighting is dim.
We recommend using a tripod to stabilize the camera when shooting in dim
lighting.
X Fill flash
Flash fires whenever a picture is taken. Use to “fill-in” (illuminate) shadows and
backlit subjects.
Y Slow sync
Auto flash mode is combined with slow shutter speed.
Suited to evening and night portraits that include background scenery.
Flash illuminates main subject; slow shutter speeds are used to capture
background at night or under dim lighting.