
Installation Guide

QUICK START
1. Determine Location
Find a location in a center hallway or similar area and
mark the center of the ceiling with a pencil. Drill a hole
through the ceiling and push a marker through so it can
be located in the attic.
2. Prepare Shutter Opening
Find the joist closest to the hole and mark out an area
equal to the size of the inner edges of the shutter with
the joist in the center. Remove all insulation from the
area before cutting. (Figure 1)
3. Cut the Shutter Opening
Use a circular saw or saber saw to cut along the marked
area of the ceiling then carefully remove the drywall
from the opening. (Figure 2)
4. Frame and Facing
Use lumber of the same dimensions as your joists and
fasten them to the edges of the frame opening using
#12D nails to create a complete square frame then
replace the insulation around the frame. (Figure 3) Then
use 2 X 6 boards to create a square rest with the inside
dimensions being the same as the opening. (Figure 4)
5. Installing the Fan
Assemble the fan properly, as pieces were moved to
protect them during shipping, and take it up to the attic.
Place the fan on top of the facing and nail it in.
(Figure 5)
6. Installing the Shutter
Draw alignment marks 7/8” away from the edges then
install the shutter with the white-headed wood screws
provided with the fan. (Figure 6)
7. Wiring Instructions
After disconnecting the power supply and installing the
provided switches in a wiring box on a nearby wall,
attach the wires as shown. (Figure 7)
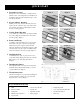
Figure 1
Figure 2
Figure 3
Figure 4
Figure 5
Figure 6
Tools and Materials Needed
Drill • 1/4” and 1/8” drill bits • Straight edge ruler
Pencil or marker • Circular saw • 1 1/2” ring shank drywall nails
#12D nails • Adjustable wrench • Flat head screwdriver
Philips head screwdriver • Safety goggles • Saber saw
Speed square
Figure 7