
User's Manual
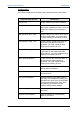

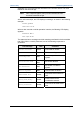

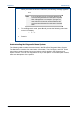
Table Of Contents
- Important Safety Information
- Introduction
- EtherProx Entry Installation
- Configuring the EtherProx Entry
- Administering the EtherProx Entry
- Diagnostics
- Glossary

Administering EtherProx Entry EtherProx Entry
Configure EtherProx
On the Configure EtherProx page, you can select EtherProx device
configuration parameters.
CONFIGURE ETHERPROX SETTING DESCRIPTION
Door Interface Unit
Specifies whether a Door Interface Unit
(DIU) is connected.
Entry PIN
Specifies whether a PIN is required for
entry.
Exit Reader
Specifies whether an exit reader is
connected.
Exit PIN
Specifies whether a PIN is required with an
exit reader. If Exit Reader is disabled, the
Exit Reader checkbox is unavailable.
Location Name
Specifies the EtherProx Entry location
name.
New Login
Specifies a login name.
New Password
Specifies a new password.
Re-enter new password
Specifies whether to re-enter the new
password for validation.
Remote Door Control
You can use the Open Door option to remotely open a door, which is similar to
swiping an access card. On the Remote Door Control page, click Open Door
to trigger the open door button and open a door immediately. The message
Unlocking Door appears.
Update Clock
On the Update Clock page, you can set the time of the reader to the local time
where you installed the reader. See section 3.3, "Set the Time and Date," for
details. Click Update EtherProx Clock to update the time. Click OK to
confirm updating the time.
Note If the EtherProx Entry is located in a time zone different from the one in
which the computer is located, you must temporarily reset the computer
time to coincide with the local time at the EtherProx Entry.
For example, to update an EtherProx Entry located in a time zone that
is two hours behind the time zone set on the computer, use the
Windows Control Panel to subtract two hours from the computer’s
current time setting before updating the EtherProx clock. Then reset the
computer to the correct local time.
Page 38 Software House