
User's Manual
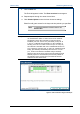
Table Of Contents
- Important Safety Information
- Introduction
- EtherProx Entry Installation
- Configuring the EtherProx Entry
- Administering the EtherProx Entry
- Diagnostics
- Glossary

Administering EtherProx Entry EtherProx Entry
To set up time clearances for the timed events and configure the timed events
that were used in the example, follow these steps:
To set time clearances and configure timed events, based on the example
1. On the Main Menu, click Administer Card Holders>Time Clearances.
2. Set the following time clearances:
Clearance A = M-F (7:00 – 7:59); M-F (12:00 – 13:29)
Clearance B = M-F (8:00 – 11:59); M-F (13:30 – 17:00)
Clearance C = M-F (6:00 – 6:59); M-F (17:00 – 20:00); Sat, Sun
(9:00 – 17:00)
3. On the Main Menu, click Administer EtherProx>EtherProx
Configuration>Configure Timed Events.
The Configure Timed Events page appears.
4. Set Door Override to Time Clearance A.
5. Set Card-Only no PIN to Time Clearance C.
6. Set Global Pin Only to Time Clearance B.
7. Click Update.
View Transactions
To view transactions, you generate a report for card-events, alarm-events, or both.
Than you need to select report options to view the report.
To select report options and view the report
1. On the Main Menu, click View Transactions.
The Transaction and Event Reporting page appears.
2. In the Type of Report Required section, select a report option.
3. Select time intervals in the Starting from and Ending at drop-down lists
to specify a time range for the report.
Page 32 Software House