Disclaimer Control4® makes no representations or warranties with respect to this publication, and specifically disclaims any express or implied warranties of merchantability or fitness for any particular purpose. Control4 reserves the right to make changes to any and all parts of this publication at any time, without any obligation to notify any person or entity of such changes. Trademarks Control4 and the Control4 logo are registered trademarks of Control4 Corporation.
Contents Chapter 1 Getting Started .............................................. 1 System Overview ................................... 1 Chapter 2 Interfaces Overview....................................... 3 Interface Devices ................................... 3 System Remote Control.................... 3 On-Screen Navigator ........................ 4 Touch Screens.................................. 4 LCD Keypad ..................................... 5 2-, 3-, and 6-Button Keypads............
About the Radio Options................. 19 Play a Station.................................. 19 Control a Tuner............................... 19 Playing Music....................................... 21 About the Music Options................. 21 Now Playing Display ....................... 32 Now Playing Dashboard ................. 32 Play Music (Create a Now Playing Queue)............................................ 33 Edit the Now Playing Queue...........
Controlling Lighting .............................. 83 Access the Lighting Options ........... 83 Control Your Lights ......................... 83 Create a Lighting Scene ................. 83 Activate a Lighting Scene ............... 84 Monitoring the House Security............. 85 View Contact Switches or Relay..... 85 Arm or Disarm Security Panels....... 85 Use Security Cameras.................... 86 Adjusting Pool Settings ........................ 86 Pool Control Basics ........................
vi
CHAPTER 1 Getting Started Welcome to your Control4 home! Life just got much easier. We hope that you are excited to learn how to use your new system. We designed the system to be as easy to use as possible, so this won’t take long. We don’t want this manual to bore you, but we do want to give you all the information you need to have the best experience possible with your new system. This manual guides you through the most important aspects of your system.
show the currently selected room, so you can easily check which room you are working with. 2. Control4 interfaces manage up to eight sub-systems per room. Depending on your setup, the menu options may differ from room to room, with unavailable options dimmed. For instance, if you’re in a room with no music available, the music icon will be dimmed out.
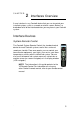
CHAPTER 2 Interfaces Overview A user interface is any Control4 device that you use to control your installed systems, such as a remote or a touch screen. Below is a breakdown of all of the interface devices you may have in your Control4 system: Interface Devices System Remote Control The Control4 System Remote Control, the standard control device for most Control4 systems, works like a universal remote on steroids.
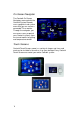
On-Screen Navigator The Control4 On-Screen Navigator, accessed with the Control4 System Remote, uses a graphical sub-system menu that you can see on a connected TV or monitor. Through the navigator, you can access every aspect of your Control4 system—from music and movies to lighting and temperature control. Touch Screens Control4 Touch Screens come in a variety of shapes and sizes and most can be installed in the wall or sit on your desktop.
LCD Keypad The Control4 LCD Keypad offers an affordable way to add complete control to any room in your house. Instead of a touch screen, simple buttons and a scroll wheel help you navigate through the sub-system menus. This interface can also control all devices connected to your Control4 system. 2-, 3-, and 6-Button Keypads Control4 keypads include customizable buttons that can be programmed for any custom scenario.
On-Screen Navigator Basics Ready to get started? The on-screen navigator works via any TV you’ve connected to the Control4 systems. Press the button on the system remote to open your on-screen navigator menu, which gives you access to your installed sub-systems. Now you can start exploring your sub-systems, starting with the main menu. From the main menu, access controls for any sub-system (Radio, Music, TV, Videos, Comfort, or Lights) or view house status or system Information.
Touch Screen Basics Control4 Touch Screens come in different shapes and size, but each features a similar menu, making it easy to use multiple touch screens. The Control4 10.5” Touch Screen, 7” Touch Screen, and Mini Touch Screen provide menu options that are nearly identical to the Control4 On-Screen Navigator options. However, these devices differ slightly in the way the pages are laid out. Main Menu Access 1. Tap the screen or hold and release the power button (10.5” wireless model only). 2.
Shortcut Buttons and Programmable Buttons The 7” touch screen also has four buttons (just below the screen) that can be custom programmed by your installer. If your installer has programmed the buttons, write their functions on the list below. NOTE: You can always find the custom buttons programmed into your system under the House menu on any Control4 interface.
LCD Keypad Basics The LCD keypad uses a combination of hard button presses and the scroll wheel to navigate the sub-systems. About the LCD Keypad 1. Selection Buttons: Selects the corresponding option on the screen. 2. Selection Dial: Scrolls through menus, acts as a selection button, and sets room volume. 3. Shortcut Button: Programmable, choose a specific action like turning off the lights, starting a playlist, or arming the Security sub-system.
System Remote Control Basics Now, instead of hunting for five different remotes, you can rely on the Control4 System Remote Control to manage your home. Besides replacing multiple audio-video remotes, this device controls all supported sub-systems, including lights, music, and temperature. About System Remote Control RCZ-SRC2-B System Remote Control Model #RCZSRC2-B can be divided into these sections: 1 1. LCD screen and button and Off button 2. Contol4 button and sub-system buttons 3.
Remote Control Modes The remote control modes are On-Screen Navigator mode: Press the button to turn on the TV interface and bring up the navigator menu. LCD Navigator mode: Use the system remote’s LCD window to manage your installed Control4 sub-systems by pressing the LCD button, which displays a menu in the LCD. Device-Control mode: Press the device-specific button to control things like your DVD player or TV. Remote Control Features Below are explanations of some of the remote control features.
Subsequent button presses, prior to LCD time-out, toggle through additional sources displayed in the LCD and turns them on. For example, you may press the Videos button again to toggle to the VCR and turn it on.
Set Preferences for Remote's LCD 1. Press the LCD button. 2. Select Info > Config to set LCD display preferences or view the battery level: Set Brightness: Use the arrows to move slider bar to brighten or dim display. Set Contrast: Use the arrows to move slider bar to increase or decrease contrast.
Install and Maintain Batteries Use and Care Tips AAA + - AAA - Install the four AAA batteries (included with the product) into the back of the device. Ensure that you insert them into the remote control according to the diagram provided in the battery compartment (with the + and - terminals aligned correctly). + - Install Batteries Remove batteries from the remote control if it is not expected to be in use for several months. AAA AAA Extreme temperatures reduce battery performance.
Internet Services Basics Control4 offers two levels of Internet services: my.Control4.com: a free service provided upon system registration at my.control4.com. Registering at my.Control4.
16
CHAPTER 3 System Activities In this chapter, you’ll learn about some typical system activities. NOTE: To use all media services, including Rhapsody, you need to register your free my.control4.com account. Setting Up Your my.control4.com Account A my.control4.com account is required to use media services. To set up your free my.Control4.com account: 1. Visit http://my.Control4.com. 2. Choose Create Account. 3. Fill out the registration according to the instructions on the page. 4.
Or you can register your controller at any time by logging into your my.control4.com account and selecting My Account > Controller Registration. Once you have set up remote access, you can enter your username and password to securely log in to your home from any internet connection in the world through the Web Navigator interface.
About the Radio Options The Radio options provide access to a Stations screen and any radio device you have added to this location in the system, such as a receiver or tuner. NOTE: For quick access to volume controls, use the Volume Quick-Control button. Stations Screen—Displays all available radio stations on your system. Tuners and Other Radio Devices—Displays controls for AM, FM, XM, satellite, cable, or radio broadcast. Play a Station 1.
Control the tuner using the device control buttons on the remote control. If you have a list of favorite channels loaded, you can select one of these channels by choosing Radio > Channels and picking a channel. Touch Screens From the Radio screen, choose a tuner device button, which, depending on what your tuner supports, may include: Scan all stations, tune up and down, or choose a specific station. Control volume.
Playing Music Play either saved digital music or music from your online Rhapsody account using your Control4 system. NOTE: To use Rhapsody, you must add an account using your touch screen or on-screen navigator. For Rhapsody-specific instructions, see the tasks beginning on pg. 46. About the Music Options On the main Music menu, you will see your music sources and zones displayed across the top of the screen.
On-Screen Navigator and Touch Screen Digital Music (default): Displays main music options.
Digital Music: My Library My Library contains both your Rhapsody library and your saved digital music.
NOTE: The Control4 icon indicates digital music files that are saved in your library. The Rhapsody icon indicates Rhapsody files that are accessible through your library. Digital Music: Rhapsody Rhapsody is a subscription-based music service that gives you unlimited access to a catalog of millions of full-length, CDquality tracks. You can listen to whatever you want, whenever you want, in any room of your house through your Control4 system.
NOTE: You can also select a song from Rhapsody Recommends (displayed next to the menu), a list of recommended music from Rhapsody based on your listening history. NOTE: To return to the main Rhapsody menu from a Rhapsody submenu, select the Rhapsody icon the Digital Music and Zones icons.
Album Composer NOTE: Search is available through on-screen navigators and touch screens only.
Music Guide Select from the following menus: On-Screen Navigator and Touch Screen Charts: View Top Artists. Play Top Albums and Top Tracks. Genres: Select a genre to view available music within the genre. (After you select a genre, you can sort the available music in a variety of ways, including by subgenre.) New Releases: Play New Releases or add them to your library. Just Added: Play or add recently added music. Exclusives: Play exclusives or add them to your library.
Channel Guide Find Rhapsody channels using the Channel Guide. Top Channels: Play top channels. All Channels: Play or add any of the available Rhapsody channels to your library. Genres: Select a channel by genre. Playlist Central View available Rhapsody playlists. Top Playlists: Play Top Playlists. Recent Playlists: Play or add Recent Playlists (playlists recently added by Rhapsody or by other users). Genres: Select a genre to play or add playlists.
Featured Playlists: Play or add Featured Playlists.
up different music, it will still be in shuffle mode until you turn it off). Repeat: The Now Playing list will continue to play and repeat until you either clear the playlist or stop the playback. When Repeat and Shuffle are both selected, then the playlist will play every song in the list before shuffling the list and repeating any song in the list. Repeat and Shuffle activated together will also continue to play music until you clear the playlist or stop playback.
Digital Music: Settings Settings allows you to choose what happens when you select the play button. Choose from the following behaviors: Play now, Add to Queue, and Ask me.
Now Playing Display Select the artist or album to view more information. Now Playing Dashboard Selecting an artist, album, or track from your library creates a Now Playing queue. Selecting more music will add it to the queue. You can save your queue as a playlist at any time using any Control4 interface. The Now Playing Dashboard display at the bottom of on-screen navigators and touch screens.
NOTE: You can use the system remote transport controls to control the music currently playing in a room. Play Music (Create a Now Playing Queue) Playing a digital album or track automatically creates a Now Playing queue. Selecting more items in the My Library list adds to the queue. To create a queue, follow the steps indicated for your navigator of choice. On-Screen Navigator and Touch Screen 1. From the Main menu, choose Music > Digital Music. Then select My Library 2.
My Genres My Channels (Rhapsody only) My Playlists 34 3. Select Play to play an album, channel, or playlist. 4. From the pop-up screen that appears, select Play Now to immediately play your selection, Append to Queue to add your selection to the queue, or Cancel.
NOTE: You can change the behavior of Play to always play now or always append music to the queue by changing the default selection under Settings. See “Digital Music: Settings”. 5. Or select an artist or album to select individual tracks to play. LCD Keypad and Remote Control 1. From the Main menu, choose Music. Then select My Library. 2. Choose one of the options below and browse to a list of albums, channels, or playlists: My Rhapsody Library Albums Artists Albums by Genre Artists by Genre 3.
Edit the Now Playing Queue You may want to edit the current queue to change the order of tracks played or to remove individual tracks from the queue. On-Screen Navigator andTouch Screen 1. From a touch screen or on-screen navigator: From the Main menu, choose Music > Digital Music > Queue. 2. Select Edit List. . . and use the following screen options to modify the list. [update the list below for the other devices] Select the up or down arrow to change a track’s order in the queue.
3. Select Save Changes to save your changes to the list and exit, or choose Cancel to reject your changes and return to the previous screen. LCD Keypad and Remote Control 1. Choose Music > Now Playing > Queue. 2. Select a song in the queue. Choose Play Now or Remove from Queue. 3. Select Save Changes to save your changes to the list and exit, or choose Cancel to reject your changes and return to the previous screen.
Save the Now Playing Queue as a Control4 Playlist Control4 playlists save all tracks currently in the playlist (both locally stored and Rhapsody tracks). Control4 playlists are only accessible on your Control4 home network. NOTE: For touch screen or on-screen navigator only. 38 1. From the main Music menu, select Queue. 2. Choose Save as Playlist. . .
3. Select Control4 Playlist. 4. Name your playlist. 5. Select Done. 6. The playlist is saved and can be accessed by going to Music > Digital Music > My Library > My Playlists.
Play a Saved Playlist On-Screen Navigator and Touch Screen 1. 40 From the Main menu, choose Music > Digital Music > My Library > My Playlists.
2. Select the play button next to the playlist you wish to play. Remote Control LCD and LCD Keypad 1. From the Main menu, choose Music > Playlist/Playlists. 2. Scroll through the playlists. 3. Highlight a playlist and press the Select button. Play a CD Stored in a Changer To access a CD stored in a connected CD/DVD changer: 1. From the Main Menu, choose Music > Browse CD’s. 2. Choose a filter option or browse all albums to select an album or track to play.
Play a CD Loaded in a CD Player 1. Load CDs into your CD player connected to the Control4 system. 2. From the Main Menu, choose Music > CD Player. 3. Use the on-screen controls or the buttons on the remote control to control the CD player directly. Add a CD to the CD Catalog using a CD Changer NOTE: Your installer must have added at least one CD to your system or you will not be able to add music.
Edit a Digital Playlist 1. Load the playlist into the Now Playing list. 2. To remove or edit the order of tracks, follow the instructions in “Edit the Now Playing Queue”. 3. To add tracks, add additional tracks to the Now Playing list. 4. Save the new list with the old name. Play Music from an iPod Music stored on an iPod can be accessed in two ways, depending on how your iPod was added to the system.
Use Zones To view a list of all rooms in the home where music is currently playing or to add, remove, or control any room’s audio, select Zones from the Main music menu. When no music is playing in the entire system, only the No Session option is listed. When a zone is playing music, you can do the following: Join current room to a session by selecting a session name. Remove current room from a session. Select other rooms in your system to send music to.
Listen to Music from Rhapsody Rhapsody is a subscription-based music service that gives you unlimited access to a catalog of millions of full-length, CD-quality tracks. You can listen to whatever you want, whenever you want, in any room of your house through your Control4 system. Control4 systems come with a free 30-day trial of Rhapsody. The following pages include instructions on how to access and use Rhapsody. Try Rhapsody with a Free 30-day Trial For a free Rhapsody trial account: 1.
Create a Rhapsody Account To create a Rhapsody account: 1. From an Internet connection, go to http://www.control4.com/rhapsody/. 2. Select Join Now. 3. Follow the directions given. Once your account is set up, you may log into Rhapsody using your Control4 system. Log in to Rhapsody To log in to Rhapsody (you only need to enter your Rhapsody account information once): 46 1. From a touch screen or on-screen navigator, select Music > Rhapsody. 2. Choose Sign In. 3.
Log out of Rhapsody It is only necessary to log out of Rhapsody if you want to stop using Rhapsody or want to switch user accounts. 1. From a touch screen or on-screen navigator, select Music > Rhapsody > My Account. 2. Choose Log Out. Play Music from Rhapsody (Create a Now Playing Queue from Rhapsody) 1. Choose Music > Rhapsody. 2. Browse to a channel, playlist, or album. Or choose Music > My Library and select a Rhapsody track that has been saved to your system. 3. Select an album or track. 4.
Search for Music in Rhapsody To search for music (on-screen navigators and touch screens only): 1. From the main Music menu, select Rhapsody. 2. Choose Search. 3.
Album Composer 49
50 4. Enter a search term. As you enter your search term, an automatic search will begin displaying results under Were you looking for. . . 5. If you see the result you want under Were you looking for. . . , select it. Otherwise, finish entering your search term and select Search.
6. Select an artist or composer to view or play albums and tracks or add the albums or tracks to your library. View Recent Search History in Rhapsody To view recent searches (on-screen navigators and touch screens only): 1. From the main Music menu, select Rhapsody. 2. Choose Search.
3. The recent search history is displayed. The results are sorted by Artist, Keyword, Track, Album, and Composer searches. 4. Use the scroll bar to view more searches by scrolling down. You can select one of the entries in search history to perform a search on the selected item.
2. Choose Save as Playlist. (Press Cancel to return to the Queue screen.) 3. Select Rhapsody Playlist. (Press Cancel to return to the Save as Playlist screen.
54 4. Name the Playlist. 5. Select Done. 6. The playlist is saved and can be accessed by going to Music > Digital Music > My Library > My Playlists.
Play or Add a Playlist in Rhapsody 1. From the main Music menu, select Rhapsody. 2. Choose Playlist Central. 3.
3.a Featured Playlists 4. Select the Play button or select next to the list you wish to play Add to save the playlist to My Playlists. NOTE: When viewing an album, select the artist’s name to view the artist’s available work. Add Music to a Rhapsody Playlist 1. 2. 3. To add music to a playlist, play the playlist. Add music to the Now Playing Queue. Save the updated list again with its old name. Edit a Rhapsody Playlist 56 1. 2. 3. 4. Play the playlist you wish to edit. 5. Select Save Changes.
Delete a Rhapsody Playlist To delete a Rhapsody playlist (on-screen navigator or touch screen only): 1. From the main Music page, select My Library > My Playlists. 2. Select the delete button to delete. next to the playlist you want Play a Channel To play a channel: 1. From the main Music menu, select Rhapsody. 2. Select Channel Guide. 3. Choose from the following Top Channels: Play a top channel. All Channels: Play or add a channel to your library.
Genres: Play or add channels within a specific genre. Choose from Top Channels: Play top channels within the genre. All Channels: Play or add channels within the genre to your library. My Channels (on-screen navigator or touch screen only): Play or add a channel to your library. 4. 58 Select a channel and select the + button to add it to My Channels or select the button to play the channel.
View Music Charts in Rhapsody To view music charts: 1. From the main Music menu, select Rhapsody. 2. Choose Music Guide.
3. From an on-screen navigator or touch screen: Select Charts. (This is the default selection in Music Guide.) For an LCD keypad, skip to step 4. 4. Choose from the following: Top Artists: View the top twenty-five artists. (Select an artist to view work by the artist.) Top Albums: Play or add the top twenty-five albums to your library. (Or select an album to play individual tracks.) Top Tracks: Play or add the top twenty-five tracks to your library.
View Genres in Rhapsody To view music by genre: 1. From the main Music menu, select Rhapsody. 2. Choose Music Guide.
62 3. Select Genres. 4. Choose from the displayed genres. (This will bring up a new screen.) 5. Play or add an album to your library.
Use Artist View in Rhapsody To enter Artist view: 1. Select an artist (from search results, album view, Rhapsody lists, or Now Playing). 2. Choose from the following: Top Tracks (automatically selected): Play or add the artist’s top tracks. Top Albums: Play or add the artist’s top albums. All Albums: Play or add all albums by the artist. Artist Sampler: Play or add sample tracks by the artist. About the Artist: See a review of the artist. Artist Channel: Play or add the artist’s channel to your library.
Use Album View 1. Select an album (from search results, artist information, Rhapsody lists, or Now Playing). 2. Choose from the following: Album Tracks Album Review Similar Albums Play New Releases from Rhapsody To view newly released albums: 64 1. From the main Music menu, select Rhapsody. 2. Choose Music Guide. 3. Select New Releases.
4. Play or add an album. Play Music Just Added to Rhapsody To view music recently added to Rhapsody: 1. From the main Music menu, select Rhapsody.
66 2. Choose Music Guide. 3. Select Just Added.
4. Play or add an album. Play Exclusives from Rhapsody To view music content exclusive to Rhapsody: 1. From the main Music menu, select Rhapsody.
68 2. Choose Music Guide. 3. Select Exclusives.
4. Play or add an album. Play Rhapsody Staff Picks To view Rhapsody Staff Picks: 1. From the main Music menu, select Rhapsody.
70 2. Choose Music Guide. 3. Select Staff Picks.
4. Play or add an album. Watching TV You can use any interface on the Control4 system to turn on and watch TV (although the System Remote is usually the easiest). screen—Lists all local or other broadcast channels, such as cable or satellite/ dish channels. TV Devices—Lists available TV devices, including local channels and cable/ satellite/dish channels, in your current location.
NOTE: If your system includes a Video Wall and a "center" room in your system, then your TV will include a Video Wall button, providing you with access to the Video Wall (from 10.5” touch screens only). NOTE: Press and hold the TV button on the System Remote to display the TV options on the monitor or TV. Change Channels You can change the TV channel a number of ways using the remote control: Press the or navigation button. Press the Channel + or - button. Enter a specific channel number on the keypad.
Use a Video Wall (10.5" Touch Screens Only) Your installer can create a Video Wall for you by installing multiple televisions on a single wall. You’ll never be bored again. You can watch more than one video source at a time. While you’ll only hear audio from one at a time, you can use the Digital Video Recorder (DVR) feature for all supported views. The system supports view swapping between televisions or monitors. To Use the Video Wall: 1. From the Main Menu on a 10.
3. Choose Instant Replay to catch any action you missed on either the left or right display. 4. Choose Swap to change your video source between displays, activating audio for any source shown in the center screen. Playing a Movie Play a Video Stored in a Changer To access a DVD stored in a connected DVD changer: 1. From the Main Menu, choose Videos. 2. From the options displayed, choose Browse/Browse Library or Cover Art (on-screen devices or touch screens only). 3. Select a movie. 4.
Cover Art (on-screen devices and touch screens only) Choose Cover Art and then highlight a movie in the list. On the system remote, press Select to view the movie details. Press Select again to start the movie. Play a Video Loaded in a Standard DVD Player or VCR Select the device using any Control4 interface, allowing you to control your DVD player or VCR with the system remote. Edit DVD Information You can edit DVD information using an on-screen navigator or touch screen. To edit DVD information: 1.
1. If your system has Autoscan enabled, you can add additional DVDs to your system using an on-screen navigator or touch screen: 2. From the Main menu, choose Videos. 3. Choose Browse Movies. 4. Choose Add. 5. In the list provided, choose the DVD player where the DVD is loaded. 6. If prompted by the screen, complete the Title, Director, Studio, and Genre fields. This information may have been completed for you. 7. Choose Save.
through the Control4 navigation devices (instead of at the thermostat controller itself). Control Wireless Thermostat Use any of the user interfaces to change comfort settings on the Control4 Wireless Thermostat, as described in the following topics: Change Thermostat Mode Change Fan Settings Change Hold Options Program the Thermostat Change Thermostat Mode The Control4 Wireless Thermostat allows you to select the mode of operation for the climate control system. Using modes can help with efficiency.
2. From the options that appear, select Thermostat (name may vary; some navigation devices skip this step). 3. From the Thermostat screen, select Mode. 4. From the pull-down menu, select one of the mode options: Off, Heat, Cool, or Auto. The screen updates immediately to reflect the new mode and set temperature. Change Fan Settings You can turn the fan on manually or set it to be automatically controlled by the heating and/or cooling system.
NOTE: The system displays the large fan icon in the upper right corner whenever the fan is operating. Change Hold Options The Thermostat Hold options allow you to hold a desired temperature setting, overriding the programmed schedule. You can set the system to hold the temperature (1) until the next programmed event, (2) for two hours, or (3) permanently. Hold Off—Cancels the current hold setting and prompts the Wireless Thermostat to follow the programmed schedule.
For each program event, you can activate an event, set a time, and set unique set points for heat and cool.
Mon through Sun (Monday through Sunday)— Programs the Wireless Thermostat for individual days. New schedule changes automatically override any conflicting existing schedule. 5. For the day (or set of days) you selected, program these six events as needed, beginning with Awake: Awake, Leave, Return, Sleep, Custom 1 and Custom 2. When you chose a day (or set of days), a programming wizard displays the Awake event screen (like the example below). This is the first of six screens you can choose to edit.
6. To edit the program event currently displayed (such as Awake) for the day(s) selected (such as Weekday), do the following: Select Enable to make this program event active. Set a time for this program event. Set a Heat Point and a Cool Point for this program event. 7. If you want to edit another program event (Leave, Return, Sleep, Custom 1 or Custom 2), select Next one or more times until the event appears on the screen (as shown), then repeat.
Controlling Lighting Access the Lighting Options 1. Choose the room you wish to control. 2. From the Main menu, select Lights. The lighting options for the selected location are displayed, including Lights and Lighting Scenes. Control Your Lights You can use any Control4 interface to control the lights in your home. 1. On the Lighting Options screen, choose Lights. 2. For Light Switches, select the switch to turn it On or Off. 3.
Add or remove lighting loads from this scene: Highlight a load and then use the left or right arrow to add or remove them. When done, select Finished. Set individual load levels (touch, touch and drag, or touch and hold as needed). Name the scene: Press in the text-entry box and then use the on-screen keyboard to enter a name for the scene. Select Save and then choose Execute to activate the scene. Activate a Lighting Scene To activate a lighting scene from a mini touch screen, remote, or LCD keypad: 1.
Monitoring the House Security House system options include security and communication features, including status information on contact switches (such as those found on doors, windows, door locks, motion sensors, cameras, and sprinklers.) View Contact Switches or Relay From the Main menu, choose House to view the status of any installed contact or relay (as shown here on a mini touch screen).
Use Security Cameras Access on-screen controls for IP security cameras using any of the graphical navigators (on-screen navigator or touch screen): 1. From the Main menu, choose House > Cameras. 2. From the grid summary that appears, select a camera to display the on-screen controls. 3. Control the camera from the Small View (the default view) or choose the Full View. Controls vary per camera. Typical controls are Pan Tilt Zoom Presets NOTE: Not all cameras can be controlled using these functions.
None Heater Solar Use the up and down arrows to adjust the temperature settings. Adding or Hiding Relays The default relays available are Filter Pump and Spa Heat. You or your installer can add additional relays (up to 31 relays total; called auxiliary circuits) through Composer. You can also rename relays using Composer. NOTE: Use Composer to hide controls not available on your pool controller. Changing System Information System information can be viewed or edited on the navigation device you are using.
Network/Wireless—Provides wireless network information, such as the IP address, the MAC address, and the DNS server. Config—Provides preference settings for Screensaver, Default, Disable View. Touch screens also have a Backlight setting option. LCD Keypad 1. From the Main menu, select Info. 2. On the Info screen, view the software version, the date, and the time, or select Config to bring up the following menu: Contrast—Set the LCD screen contrast. Brightness—Set the LCD screen brightness.
Connect to a Director To access your system, you must be connected to a Director. To connect to a Director (or to change Directors in order to switch the system your Navigators are accessing), do the following: 1. From the Main menu, select Info. The Info options bar or list is displayed. 2. From the Info options, choose the Director button. The Connect to a Director screen appears. 3. In the Connect to a Director list of IP addresses, highlight your controller's IP address and select Connect.
2. On the Network screen, choose the IP Address button. The IP Settings screen is displayed. 3. On the IP Settings screen: Either accept the DHCP default (for dynamic IP addresses) or use the arrows and Select button to choose Assigned (for static IP address). 90 4. If you chose Assigned, use the arrows and Select button to enter the IP Address for this device in the keypad provided, and then press OK. 5. Choose OK to return to the Network screen. 6.
Allow Your Dealer to Remotely Access Your System If your dealer has requested access to your system from my.control4.com, do the following to have your controller check in once every 24 hours to give the dealer access: 1. Go to Info > Remote Access > Service Connection. 2. Select Check In. Set Screen Saver Options 1. From the Info options, select Config. 2. On the Config screen, select the Screen Saver button. The Screen Saver screen is displayed. 3. Select a Screen Saver option from the list. 4.
2. On the Config screen, select the Default. The Default screen is displayed. 3. Select a Default Location and View from the list. 4. (Touch Screens only) Select a Show View option from the list. 5. Choose a Reset to default option from the list. Options include: After Screensaver After Suspend Specific times, ranging from 15 seconds to 1 hour 6. To exit the Default screen, select Back. NOTE: When a view is locked, you cannot change that setting unless you know the passcode.
On the Disable View screen, select one or more views to lock (or deselect views to unlock), and then select Back. Using Control4 Internet Services Control4 makes it easy to access your home systems from anywhere in the world through your favorite web browser. Do you think you left the lights on? With your 4Sight account you can securely view your system and make any necessary adjustments, like turning those lights off. Access Web Navigator If you are already logged into My.Control4.
View Entire System at a Glance Using the scroll bar on the right, you can navigate the Overview page, which shows all installed components grouped by systems. The status of each component is indicated by its displayed icon. For example, in a system that has lights, contacts, and relays, here are some of the status icons you might see: Hall Light - Off Bedroom Light - On Front Door - Closed Back Door - Opened Family Room Fireplace - Off Bedroom Fireplace - On View or Change Lighting 1.
NOTE: Supported Switch settings are on and off only. Dimming levels apply only to dimmers. Check or Change Security Settings NOTE: .The Security interface displayed depends on the installed security system. Use the steps provided here as a guideline for exploring your model-specific security options. 1. At the top of the page, click Security. 2. Click Toggle: Keypad slide-down tab to obtain modelspecific instructions or options.
View or Change Thermostat 1. At the top of the page, click Climate. 2. Under Thermostat Controls: View current temperature, set points, mode status, and fan status. Change Set Heat point by clicking the + or - symbols. Change Set Cool point by clicking the + or - symbols. Change Mode by clicking Auto, Heat, Cool, or Off options. Set Fan to Auto or On. NOTE: On the Control4 Thermostat, a Hold: Permanent tab is available that when clicked provides a variety of Hold options (shown here).
View Sensors or Motors 1. At the top of the page, click Sensors and Motorization. 2. Under Sensor Status, you can view individual sensor status. 3. Under Motorization Status, you can view or change the motorization status. To open or close a relay, click the relay's icon.
Setting Up a Custom Screen Saver The Custom screen saver option allows users to mix and match available screen saver options, including opting to use stored photos. NOTE: Screensavers are available only for on-screen navigators and touch screens. To set up a custom screen saver: 1. From the main menu, select Info > Config > Screen Saver. 2. Enable the Custom option. 3. Select settings. Choose from the following display options: Media Time Date Temp Photo Shuffle (photo) Change photos . . . Every 4.
Setting Up a Wakeup Scene You can use a touch screen or on-screen navigator to set up a wakeup scene. NOTE: Using the remote control or LCD keypad, you can now configure Wakeup events (like an alarm clock), much like the Wakeup option already found in the graphical Navigators (Comfort > Wakeup). If this option appears in your list of Comfort options, you can set alarm clock-like settings: 1. On the Comfort screen, choose the Wakeup button. 2. Select the on/off button. 3.
Using Additional Custom Options Additional custom options are available for your system. These include announcement agents and programmable buttons. Ask your installer to set up any of these options that interest you. Announcement Agents The announcement agent displays a textual message on your navigators or plays a sound clip. You can use the announcement agent to be notified when someone rings your doorbell or to let your family know that dinner is ready with the press of a button.
CHAPTER 4 Frequently Asked Questions This chapter addressed questions frequently asked by new users. Do I have to use my TV as the interface to select music, listen to the radio, control my lights, etc.? No. Your TV interface is just one of a variety of interfaces you can use with your Control4 system.
Can I listen to the music on my MP3 player or USB hard drive with my Control4 system? Yes. If you have music in digital format on your MP3 player or USB hard drive, you can plug it into the USB port on your Controller, scan your music and stream it to any room in your house. You can use Control4's Composer Media Edition (sold separately) to scan your music and import album cover art and information for your entire music collection.
Index Symbols "4" Button 6, 11 Numerics 2-, 3-, and 6-Button Keypads 5 4Sight 93 4Sight Internet Services Basics 15 4Sight Services 5 7" Touch Screen 7 Shortcut and Programmable Buttons 8 A Activate a Lighting Scene 84 Add a CD to the CD Catalog 42 Add a CD using a CD Changer 42 Add a DVD to the DVD Catalog 75 Add Music 42 Add or Remove Lighting Loads from a Scene 84 Adjusting Pool Settings 86 Announcement Agents 100 Auto 78 AV Device Control 88 AV Help Wizard 88 B Blinds 76 Browse/Browse Library 30, 74
C Ceiling Fans 76 Change Channels 72 Change Fan Settings 78 Change Hold Options 79 Change Thermostat Mode 77 Changing Locations 82 Contact Information 102 Contact Switches 85 Control Blinds 76 Control Ceiling Fans 76 Control Fireplaces 76 Control Wireless Thermostat 77 Change Fan Settings 78 Auto 78 On 78 Change Hold Options 79 Change Thermostat Mode 77 Emergency Heat Mode 77 Heat Mode 77 Off Mode 77 Change Thermostat Mode Cool Mode 77 Control4 2 Control4 System Basics 1 Room-based Control System 1 Sub-Syst
Rhapsody 47 Custom Buttons 10.
2-, 3-, and 6-Button Keypads 5 4Sight Services—Web Navigator 5 LCD Keypad 5 On-Screen Navigator 4 System Remote Control 3 Touch Screens 4 Interface Selection 101 Interfaces Overview 3 L Lamps 102 LCD 11 LCD Button 11 LCD Keypad 5 About 9 Selection Buttons 9 Selection Dial 9 Shortcut Button 9 Basics 9 About Troubleshooting 9 Controlling a Tuner 20 Lighting Activate a Lighting Scene 84 Adding Appliances 102 Adding Lamps 102 Change 94 View 94 Lighting Scene 84 M Mini Touch Screen 7 Modes 11 Device-Control Mo
Motors View 97 Music Using a USB Hard Drive 102 Using an MP3 Player 102 Music Options Menu 21 N Name a Lighting Scene 84 Network Settings View or Change 89 Now Playing Dashboard 32 Now Playing Display 32 O Off Button 11 Off Mode 77 On 78 One-Touch Action 11 On-Screen Navigator 4 Basics 6 Main Menu 6 Controlling a Tuner 19 Info Screen 87 Other Radio Options 19 P Play a CD Loaded in a CD Player 42 Play a CD Store in a Changer 41 Play a Saved MP3 Playlist 40 On-Screen Navigator or Touch Screens 40 Play a Vi
Edit CD Information 43 Edit the Now Playing Queue 36 Browse/Browse Library 30 Edit 30 Shuffle 30 Play a CD Loaded in a CD Player 42 Play a CD Stored in a Changer 41 Play a Saved Album or Track Create a Now Playing Queue 33 Play a Saved MP3 Playlist 40 LCD Keypad 41 System Remote Control LCD 41 Play Music from an iPod 43 Rhapsody 47 Play Music from an iPod 43 Playing a Movie 74 Play a Video Stored in a Changer 74 Playing Music Music Options Menu 21 Playing the Radio 18 About the Radio Options 19 Other Radio
Types of Heating 86 Program the Thermostat 79 Using On-Screen Navigator or Touch Screen 80 Programmable Buttons 88 10.
Create 46 Room-based Control System 1 S Security Cameras 86 Security Settings Change 95 Check 95 Selection Buttons 9 Selection Dial 9 Sensors View 97 Setting Up a Custom Screen Saver 98 Setting Up a Wakeup Scene 99 Shortcut Button 9 Shuffle 30 Stations Screen 19 Subsequent Button Presses 12 Sub-System Buttons as Shortcuts 11 First Button Press 11 One-Touch Action 11 Subsequent Button Presses 12 Sub-Systems 2 Comfort 2 House 2 Info 2 Lights 2 Music 2 Radio 2 TV 2 Videos 2 Support 102 Switches Changing LED C
Access the Info Screen 87 About 87 Director 87 LCD Keypad 88 About 88 Brightness 88 Contrast 88 Sleep Brightness 88 Sleep Time 88 Network 88 On-Screen Navigator 87 System Remote Control 88 About 88 Config 88 Help 88 Touch Screen 87 Connect to a Director 88, 89 Enable or Disable Viewing Options 92 Set Default Location 91 Set Screen Saver Options 91 View or Change Network Settings 89 System Overview 1 Basics 1 Room-based Control System 1 Sub-Systems 2 System Remote Control 3 Basics 10 Features "4" Button 11 L
View Part Number or MAC Address 13 Modes 11 Device-Control Mode 11 LCD Navigator Mode 11 On-Screen Navigator Mode 11 Set LCD Preferences 13 Controlling a Tuner 20 Info Screen 88 System Remote Control Part Number or MAC Address 13 System Remote Control Use 101 T Thermostat Change 96 View 96 Touch Screen 4 10.5" Touch Screen Use a Video Wall 73 Basics 7 10.
Access Web Navigator 93 Check or Change Security Settings 95 View Entire System at a Glance 94 View or Change Lighting 94 View or Change Thermostat 96 View Sensors or Motors 97 Using Additional Custom Options 100 Using the System Remote Control 101 Using Zones 44 V View Contact Switches or Relay 85 Volume Control Touch Screen 7 W Wakeup Scene 99 Watching TV 71 Change Channels 72 TV Devices 71 Use a Video Wall 73 Web Navigator 5 Wireless Thermostat 77 Z Zones 44 113
114