
Technical data

CHALLENGE/Onyx Diagnostic Road Map 6-11
6.4 IP19 IDE Tests
The IP19 IDE tests are divided into four categories:
• IP tests, described in Section 6.4.1, “IP Tests”
• Translation lookaside buffer (TLB) tests, described in Section 6.4.2, “Translation
Lookaside Buffer (TLB) Tests”
• Floating-point unit (FPU) tests, described in Section 6.4.3, “Floating-Point Unit (FPU)
Tests”
• Cache tests, described in Section 6.4.4, “Cache Tests”
To start an IP19 IDE test, boot IDE from the Command Monitor. See Section 6.2, “Running
an IDE Test.”
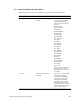
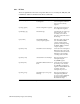
Set the desired report level. The default report level is 2.
Available report levels are shown in Table 6-6.
Each test level prints out messages for that level and all lower levels.
Report Level Function Comments
Level 5 Displays debugging messages. Too much detail for most testing
scenarios.
Level 4 Prints out memory locations as they are
written.
Increases testing time.
Level 3 Prints out one-line functional
descriptions within tests.
Probably the most useful level for
general testing.
Level 2 (default) Prints out only errors and titles. This is the default level.
Level 1 Prints out only titles and pass/fail
Table 6-6 IP19 IDE Report Levels