
User guide


System User Guide
Copyright © 2014 Control4. All Rights Reserved.
Saved: 10/28/2013 12:48:00 PM
200-00001 Control4 System
User Guide
Page 92 of 160
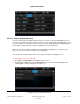
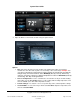
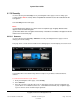
3. Click the pencil icon in the upper-right corner to open ‘edit’ mode.
4. Select Create New.
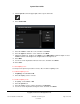
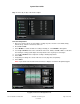
5. Select the rooms to add to the scene, and then select Next.
6. Select the lights to add to the scene, and then select Next.
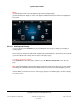
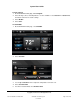
7. Change the light levels, and then select Next or select Add Lights to add more lights or select
Learn to learn the current light levels of lights that are already on or off.
8. Select Next.
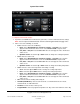
9. Use the on-screen keyboard to name the new scene, and then select Done.
10. Select Save.
To edit a lighting scene:
See Step 3 in the previous procedure to create, edit, or rename a lighting scene.
To activate a lighting scene:
1. In Lighting, select Scenes or All.
2. Select the lighting scene to execute.
To rename a lighting scene:
1. In Lighting, select Scenes or All.
2. Select the pencil icon.
3. Select the lighting scene to rename, and then select Rename.
4. Use the on-screen keyboard to change the name, and then select Done.