
User guide


System User Guide
Copyright © 2014 Control4. All Rights Reserved.
Saved: 10/28/2013 12:48:00 PM
200-00001 Control4 System
User Guide
Page 128 of 160
View your changes
1. Ensure that your installer has added and configured network-attached storage, a USB drive, or a
controller that contains a hard drive to store photos so they appear in the screen saver view
below.
2. Ensure that you have a NAS device connected to the Control4 system that contains your screen
saver photos.
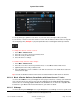
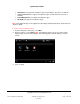
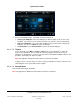
To change a screen saver:
Select More > Settings > Screen Saver. Note: The following screen may vary on a touch screen,
MyHome app, and on-screen Navigator. The following figure shows the display on a touch screen.
Screen Saver Modes
None—Select this option when you don't want to use a screen saver.
Blank—Select this option to use a blank screen saver.
Current Media—Select this option to show the currently-playing media.
Time/Date—Select this option to show the date and time.
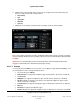
Custom—Select this option to set the custom settings to use: Media, Time, Date, Temp,
Photo, and Shuffle. See "Custom Screen Saver Settings" below.
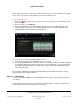
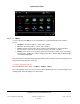
Screen Saver Timeout
Use the up or down arrows to set the time, in seconds or minutes, before the screen
saver turns on.
Change Photos Every
If you select Photo in ‘Custom Screen Saver Settings,’ use the up or down arrows to set
the time, in minutes or seconds, before the photo changes.
Wake on Motion—Select the checkbox to wake up the screen saver when the touch screen
is moved. Note: This feature is not supported on devices that run MyHome apps.
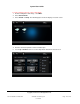
Preview—Select this option to view what the screen saver will look like.
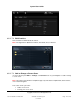
Custom Screen Saver Settings