
User's Guide

Control4 Wireless 6-Button Keypad Installation and User Guide 1
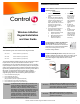
Wireless 6-Button
Keypad Installation
and User Guide
Supported Models, Features, and Fixtures
This installation guide covers these 6-button keypad models:
The Control4 Wireless 6-Button Keypad can be configured as a peer-
to-peer device or as part of the Control4 network. It can be
programmed to do any supported network event (such as controlling
a group of lights, a music zone, or a security system) or can simply be
used to replace 3 light switches. It installs in a standard wall box using
typical wiring standards and gets power from a nearby power outlet or
light switch. It communicates to the system using a wireless
connection and features a tri-color LED for system feedback. It
supports lighting fixtures with the following load requirements:
• 120 Volt incandescent (all types)
• 120 Volt halogen (all types)
• 120 Volt magnetic low voltage
(all types with 70 percent or greater load factor)
• 120 Volt electronic low voltage (dimmable only)
• 120 Volt fluorescent light fixtures (dimmable only)
Installation Instructions
Ensure that the location and intended use meet the
following criteria:
To avoid injury or death, turn OFF local
electrical power. To turn off the power,
either flip the circuit breaker or remove fuse
from fuse box. To ensure the wires do NOT
have power running to them, use an
inductive voltage detector.
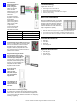
Prepare and identify all wires. Identify the wires in your
wall box. Straighten the wire ends. With a wire cutter, cut off
the bare wire just below the plastic insulation on all wires.
Use a wire stripper to strip off about 3/8-inch of the
insulation.
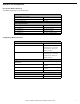
LDZ-101-W Wireless 6-Button Keypad (802.15.4)
LDZ-101-B Wireless 6-Button Keypad (802.15.4)
LDZ-101-A Wireless 6-Button Keypad (802.15.4)
WARNING!
To reduce the risk of serious injury or death, turn all
power OFF before installing this product. Using this
product in a manner other than outlined in this
document voids your warranty. Further, Control4 is
NOT liable for any damage incurred with the misuse of
this product. See “Limited 1 Year Warranty” on page 4.
This product generates heat. The room must have
adequate ventilation or heat dissipation ability. Do
NOT use this device to control a device with a non-
dimmable load. You should only use it with devices
that have dimmable feature support.
DO (OK, Normal) DON’T
• Install in accordance with all
national and local electrical
codes.
• Wall box size required depends
on your wiring. The 6-button key-
pad alone needs a depth of 2.5
inches. To calculate the total
depth required, add 2.5 inches to
the amount of space recom-
mended in the NCC Code for
your configuration.
• The range and performance of
the control system is highly
dependent on the following:
• Distance between devices
• Layout of the home
• Walls separating devices
• Electrical equipment
located near devices
• If installing a
multi-unit 6-but-
ton keypad, Do
NOT continue
until you have
read “Multi-Unit
Installations” on
page 2.
• Do NOT use
where total watt-
age is under 25
watts.
• Do NOT exceed
maximum load
rating of dimmer
(which is 1000W
for a single unit,
if both side tabs
are in tact).
IMPORTANT:
The National Electric Code (NEC) requires 6 inches of
extended wire from the wall box. If your wiring does
not meet this requirement, you will not meet code. Do
NOT cut wire shorter than 6 inches.
IMPORTANT:
When installing this product in a commercial
application or metal wall box, you might need to
ground it to the wall box.
1
2
3