
User's Manual


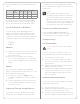


The following table shows the serial communication
values.
Hardware
Flow
Control
Odd
Parity
Even
Parity
No
Parity
Other
Serial Port 1 X X X
Serial Port 2 X X X
To configure a port for serial or IR, make the appro-
priate connections in your project using Composer
Pro. See the Composer Pro User Guide for details.
Set Up IR Emitters or IR Blaster
Your system may contain third-party products
that are controlled through IR commands (usually
using remote controls). To provide a way for the
Controller to control a device that only recognizes IR
commands, complete one of the following setups:
• IR Emitters
• IR Blaster
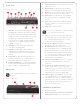
IR Emitters
1 Plug the 3.5 mm connector end of one of the four
(4) IR stick-on emitters provided into an IR Out
port on the HC-250.
2 Place the stick-on emitter end over the IR
receiver on the Media Player, TV, or other target
device to drive IR signals from the HC-250 to the
target.
IR Blaster
The HC-250 is also equipped with an IR blaster
which is located just left of the front LEDs. To use the
blaster rather than an IR emitter:
1 In Composer, connect the IR Blaster of the
Controller to the IR In for the device you want to
control.
2 Test and verify that the HC-250 is positioned in
such a way that the blaster can reach the device
you want to control.
Setting Up External Storage Devices
You can store and access media from an external
storage device, for example, a network hard drive
or USB memory device, by plugging the USB drive
into the USB port and configure or scan the media in
Composer Pro.
NOTES:
(1) We support only USB drives that are
externally powered or USB sticks (solid state).
Self-powered USB drives are not supported.
(2) When using USB storage devices on an
HC-250, you can only use one (1) partition with
a 2TB maximum size. This limitation applies to
the USB storage on all other Controllers also.
Composer Pro Driver Information
Select the Home Controller HC-250 driver in
Composer Pro and add it to your Composer project.
See the Composer Pro User Guide for details.
Troubleshooting
Factory Restore Button
CAUTION! This action deletes the Composer
project.
To restore the HC-250 for system recovery to the
factory default image, perform the following steps:
1 Disconnect power to the HC-250.
2 Insert one end of a paper clip into the small
hole on the back of the HC-250 that is labeled
‘Factory Restore.’
3 While pressing and holding the Factory Restore
button, power on the HC-250.
4 Hold the button until the WiFi Status LED blinks
Orange. This should take 5 to 7 seconds. The
Status LED will blink Orange while the restore
process is running.
Identification Button (Network Reset)
To reset the HC-250 network settings to the default,
perform the following steps:
1 Disconnect power to the HC-250.
2 While pressing and holding the ID button on the
back of the HC-250, power on the HC-250.
3 Hold the ID button until the Data, Link and Power
LEDs are solid Blue, then immediately release the
5