
User guide


Composer Pro User Guide
Copyright © 2012 Control4. All Rights Reserved.
Saved: 1/20/2012 1:31:00 PM
200-00005 Composer Pro
User Guide Part 1
Page 68 of 199
Prerequisites
Ensure that either the Puck Switch Module or Puck Dimmer Module is installed as directed in the
Control4 Wireless Puck Dimmer or Switch Module Installation Guide available on the Control4 Dealer
website.
To add and configure a Wireless Puck Dimmer or Switch Module:
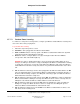
1. Start Composer and connect to a Director.
2. Click System Design.
3. In the project tree, select the room where the Wireless Puck Switch Module or Wireless Puck
Dimmer Module resides.
4. In the Items pane > Search tab > Device Type: Light > Manufacturer: Control4 double-click the
Wireless Puck Dimmer Module: C4-DM201-Z or the Wireless Puck Switch Module: C4-SM201-Z
to add the object to the project tree.
5. When the device shows up in the project tree, you can rename it to whatever name works the
best for you or your customer.
6. Click Connections.
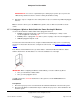
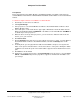
7. Click the Network tab to make the necessary network connection. To do this, select the Wireless
Puck Switch Module or Wireless Puck Dimmer Module, and click the Identify button shown
below.
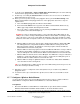
8. In Identify mode, go to the physical Puck Switch or Puck Dimmer, and press four (4) times the
button on the puck or the button that is connected to Contact 1 on the puck to identify the Switch
or Dimmer to the Control4 system. The network address appears in the IP Network Connections
pane.
9. Click Close to exit the wizard.
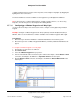
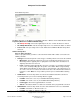
10. (Optional) To configure the properties, click System Design. In the project tree, select the Puck
Switch or Puck Dimmer object for the properties to appear as shown below. Click Set to save
your changes.