
User guide


Composer Pro User Guide
Copyright © 2012 Control4. All Rights Reserved.
Saved: 1/20/2012 1:31:00 PM
200-00005 Composer Pro
User Guide Part 1
Page 51 of 199
Note: When programming using double and triple-tap events, be aware that Press and Release
events also occur when double and triple-tap events occur. Plan your programming using these
events so that they don't conflict with the intended outcome. In most cases, when using double and
triple-tap programming events, don't program on the Press and Release events.
These sections provide information about how to configure the lights or Keypads types for your
Control4 system.
“Configure a 2, 3 or 6-Button Keypad”
“Configure a Wireless Switch or Dimmer or an Inline Dimmer”
“Configure a Wireless Outlet Dimmer”
“Configure a Wireless Outlet Switch”
“Configure a Wireless Outlet Switch for Power Sensing AV Devices”
“Configure a Wireless Puck Dimmer or Switch Module”
2.5.7.1 Configure a 2-, 3-, or 6-Button Keypad
Use the Control4
®
Composer Pro System Design and Connections views to configure Keypads.
Note: To configure a 2, 3, or 6-Button Keypad for a 3-way switch, see “Configuring Lights for 3-Way,”
“Configuring a 2-Button Keypad as a 3-Way Light,” or “Configuring a 3-Button Keypad to Control a 3-
Way Light.”
Prerequisites
Ensure that the Keypad is installed as directed in the Control4 Wireless 2, 3, or 6-Button Keypad
Installation Guide available on the Control4 Dealer website.
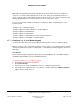
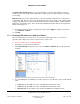
To add and configure a 2, 3, or 6-Button Keypad:
1. Start Composer and connect to a Director.
2. Click System Design.
3. In the project tree, select the room where the 2, 3, or 6-Button Keypad resides.
4. In the Items pane > My Drivers tab > User Interface > double-click 2, 3, or 6 Button Keypad to
add the object to the project tree.