
User guide

Composer Pro User Guide
Copyright © 2012 Control4. All Rights Reserved.
Saved: 1/20/2012 1:31:00 PM
200-00005 Composer Pro
User Guide Part 1
Page 44 of 199
2.5.6.7.1.1 Configure Speaker Point for Ethernet Use
To add and configure an Ethernet Speaker Point to a Control4 project:
Note: By default, Speaker Point is configured for Ethernet use. If you are using WiFi, however, also
follow the instructions in the section, "Configure Speaker Point for WiFi Use" later in this section.
1. Start Composer and connect to a Director.
2. Click System Design.
3. In System Design on the project tree, select the room where the Speaker Point resides.
4. In the My Drivers tab, go to Audio/Video > Speaker Point, and then double-click to add the
Speaker Point object to the project tree.
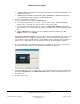
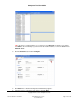
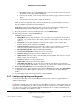
5. In the Connections view, use the Network tab to make the necessary network connection. To do
this, select the Speaker Point object, and click Identify.
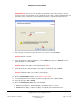
6. In Identify mode, go to the physical Speaker Point, and press the front panel button to identify
the Speaker Point to the Control4 system. Click Close.
7. Ensure that the room connections are set correctly for the room.
Note: When you add a Speaker Point, Audio or AV switch to a room, by default the Audio End
Point is assigned by the first device added to the room. When you add a Receiver to a room, it is
automatically set or reset as the Audio End Point.
a. To get to Room Connections, go to Connections and select the room.
b. Verify that the Audio End Point setting matches the intended setup of your Control4 system.
The Room Connections appear in the center pane. If you are setting up a custom
configuration, adjust the Room Connections accordingly. For more information about Room
Connections, see ”Connecting Rooms.”
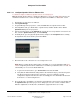
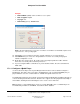
8. Preset Treble, Bass, and Balance. In either the System Design or Connections view, double-click
the Speaker Point object in the project tree to bring up its on-screen controls, and then click to
make the adjustments for Treble, Bass, and Balance (supported values are 0 - 100).