
User guide


Composer Pro User Guide
Copyright © 2012 Control4. All Rights Reserved.
Saved: 1/20/2012 1:31:00 PM
200-00005 Composer Pro
User Guide Part 1
Page 33 of 199
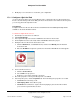
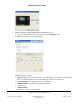
• Debug Mode: Use the drop-down list to select an option to log or print in this mode. Select
from Print, Log, or Print and Log. This option is tied to the output options in the Lua tab (Step
9).
• Firmware Version: Shows the version number for the firmware.
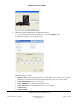
9. (Optional) See the Documentation tab for more information.
10. Click the Lua tab to view logging output.
2.5.6.4 Configure a 4-Zone Amplifier
Use the Control4
®
Composer Pro System Design and Connections views to add and configure a 4-
Zone Amplifier. This device lets you enjoy up to four (4) zones (rooms) of music in the home.
Prerequisites
Ensure that the 4-Zone Amplifier is installed as directed in the Control4 4-Zone Amplifier Installation
Guide available on the Control4 Dealer website.
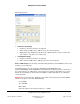
To add and configure a 4-Zone Amplifier:
1. Start Composer and connect to a Director.
2. Click System Design.
3. In the Composer Pro, System Design view, select the room where the 4-Zone Amplifier resides.
4. In the My Drivers tab under Audio/Video > Amplifier, double-click Multi Channel Amplifier 4
Zone to add the object to the project tree.
5. Click Connections.
6. In the Connections view, use the Network tab to make the necessary network connection. To do
this, select the Amplifier object, and then click the Identify button.
IMPORTANT: The Amplifier can be identified by IP only. The Amplifier can communicate with the
Control4 system using the TCP/IP network.
Note: If you are using a TCP/IP network and the latest shipping version of this device, you can
set this device to either DHCP Client (default) or a client that uses Static IP. To change this
setting, see the LCD screen menu on the device.
7. In Identify mode, go to the physical 4-Zone Amplifier, and press the Select dial to identify the 4-
Zone Amplifier to the Control4 system. Click Close.