
User guide


Composer Pro User Guide
Copyright © 2012 Control4. All Rights Reserved.
Saved: 1/20/2012 1:31:00 PM
200-00005 Composer Pro
User Guide Part 1
Page 133 of 199
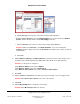
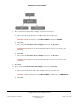
13. You have just completed the setup for the Theater. Click next to move to the Bedroom.
To define devices in the Bedroom:
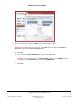
1. Notice that the selected room on the left is now Bedroom. For the selected room, check the
appropriate boxes to indicate the devices used in this room.
Example: For the Bedroom: De-select AV Components and Sensors. Check User Interface,
Multi-Room Audio, Lighting, and Motorization.
2. Click next.
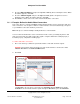
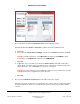
3. Add the devices to this room. Double-click a device to move the devices from the Available
Devices list to the Devices in Room list.
Example: Add a Touch Screen to the Bedroom.
4. Click next.
5. Choose how the digital audio is received in this room.
Example: Audio is sent digitally to the Touch Screen. Choose Through a Touch Screen.
6. Click next.
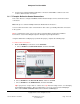
7. Add the Dimmers, Switches, and Outlet Switches to the Devices in Room list, and give each a
descriptive name (edit immediately after adding while still in edit mode, or right-click later).
Example: Add a Wireless Dimmer and rename it Dimmer.
8. Click next.
9. Add the Motorized Devices to the Devices in the Room list.
Example: Add the Gas Fireplace to the Bedroom.
10. You have just completed the setup for the Bedroom. Click next to move on to the Front of the
house.
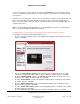
To define devices in the Front Room:
1. Notice that the selected room on the left is now Front Room. For the selected room (Front Room),
check to identify the types of devices you have in that room, and then click next.
Example: De-select AV Components, Multi-Room Audio, and Lighting. Check User Interface,
Motorization, and Sensors.
2. Click next.