
User guide


Composer Pro User Guide
Copyright © 2012 Control4. All Rights Reserved.
Saved: 1/20/2012 1:31:00 PM
200-00005 Composer Pro
User Guide Part 1
Page 112 of 199
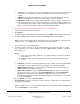
9. In the Screen Saver pane, click Add. In the My Pictures dialog, browse to the photos you want to
copy to the storage location, select them, and click Open. The files will be copied to the storage
location you specified in Step 8, and a folder may be created for you using the Control4 name
(Example: Control4 pictures).
Note: When media is added (copied) to the storage device, it is pre-scaled to the resolution for all
of the Navigators. Control4 preserves the aspect ratio of the original image, and boxes the extra
space with bars for any given screen size.
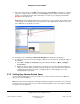
10. In Composer Pro, click Tools > Refresh the Navigators to display the copied photos.
11. To activate the Screen Saver in each Navigator (On-Screen, Touch Screen, or MyHome app), do
the following:
a. Go to Info > Config > Screen Saver (on System Remote Controls) or More > Settings >
Screen Saver.
b. Enable the Custom option, and then choose the Photo Screen Saver option along with any
other Screen Saver option you want to include. For photos only, check the Photo option. See
“Setting Up a Custom Screen Saver” to display the photos on the Navigator or see the
Control4 System User Guide.
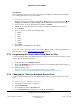
2.7.2 Setting Up a Custom Screen Saver
Use the Control4
®
Navigator to create a custom screen saver to view on Touch Screens, MyHome
apps, or On-Screen Navigators.
Note: This task must be completed on a Navigator. Either the Installer or homeowner can set this up.
The Custom Screen Saver option lets users mix and match available screen saver options, including
the option to use stored photos.