
User guide


Composer Pro User Guide
Copyright © 2012 Control4. All Rights Reserved.
Saved: 1/20/2012 1:31:00 PM
200-00005 Composer Pro
User Guide Part 1
Page 111 of 199
• Controller —If the Controller has no storage, add and connect a device that contains storage
for your photos; for example a USB drive or Network File Share (see Step 6 in the next
section).
• USB Drive—Ensure that the USB drive is attached to the Controller. When you insert the
USB drive, it will appear in the project tree in the same room as the Controller.
• Network File Share—Ensure that the Network File Share object is added to the project tree
and connected (see the steps to do this later in this procedure). Ensure that you have access
to the Network File Share, that you have a valid Username, Password, and Workgroup, and
that you can identify the network location (you will need to add the path).
To set up the Photo Screen Saver option to display photos on the Navigators:
1. Start Composer and connect to a Director.
2. Click Agents.
3. (First time only.) From the Agents view > Agents pane, click Add to add the agent to the project.
4. From the Available Agents dialog, choose the Screen Saver agent, and click OK.
Note: If Screen Saver already appears in the Agents pane, it has already been added. Go to the
next step. If not, see “Example: Program Using the Screen Saver Agent.”
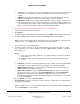
5. In the Agents pane, select Screen Saver.
6. From the storage location list, use the drop-down menu to choose the location where you will
save your photos for use on the Navigators (Controller, CBM Flash Disk: USB drive, or Network
File Storage, etc.).
Notes:
(1) If the storage option that you want does not appear in the list, disconnect from Director
and reconnect.
(2) At any given time, only one storage location can be set as the photo Screen Saver
source.
• Controller—If you have a Controller with disk space (for example, Home Controller HC-500
or HC-1000), an option appears in the list (for example, Home Controller HC1000).
• CBM Flash Disk (USB drive)—If you inserted the USB drive in the Controller earlier, the
CBM Flash Disk option appears in the list.
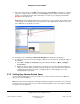
• Network File Storage—If you select Network File Storage, specify where the Control4
system needs to go to copy the files. Click System Design and select the Network File
Storage icon in the project tree (you will have to add it from the Items pane). In the
Properties pane, type the Username, Password, Workgroup and then browse to the network
location. Click Connect.
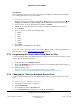
7. Click the Media view, and select Screen Saver.
8. Click Configure in the Screen Saver pane, set the location to copy the files to (for display in the
Navigators), and click OK.
Note: If you didn’t choose a storage location in Step 6, an error message appears. Click OK, and
then click Configure to set the location.