
User guide


Testing
22
Need Help ? Bayer Diabetes Care: 1-800-348-8100
(available 24 hours a day, 7 days a week)
Testing
23
www.bayerdiabetes.com/us
Control Solution Testing
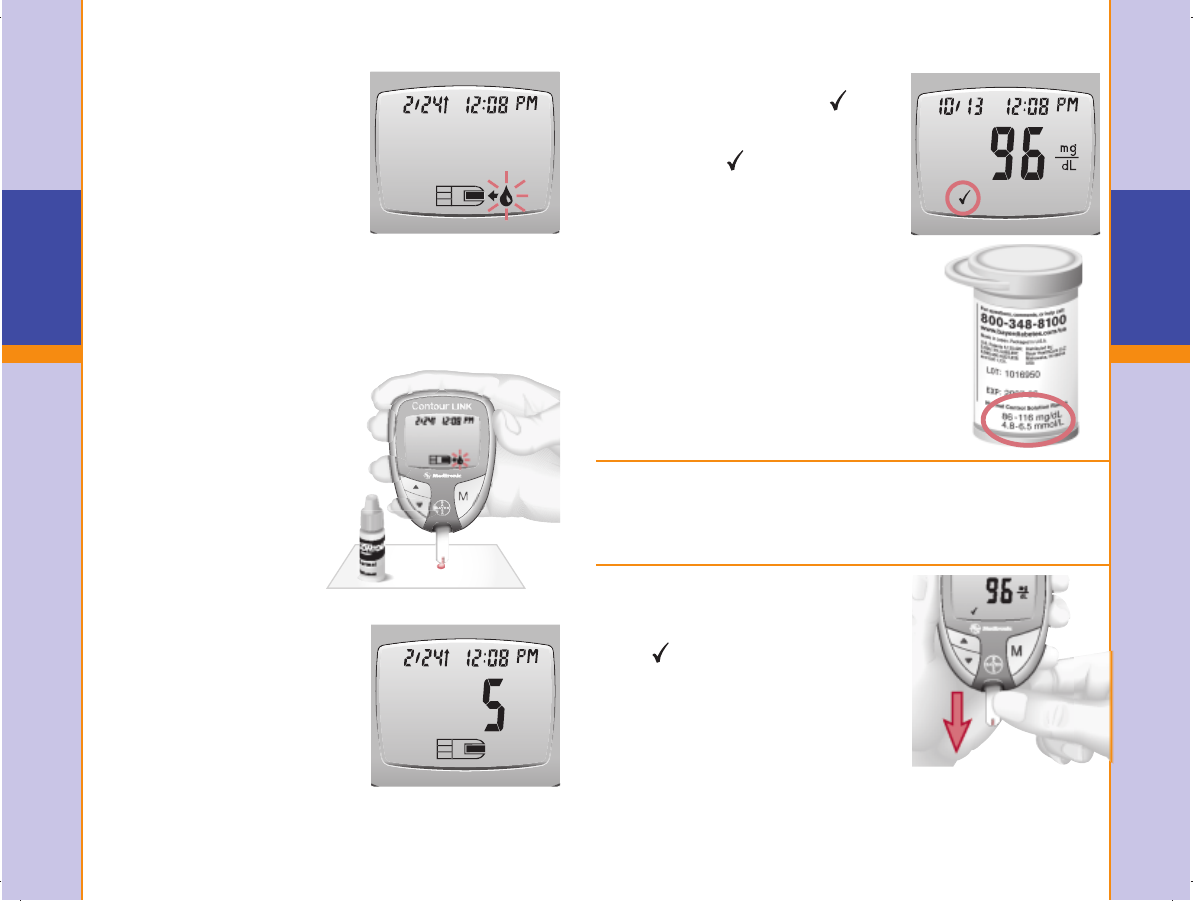
The meter will turn on. A test
strip with a fl ashing blood drop
will appear, letting you know
the meter is ready to test.
Gently rock the control bottle before opening to ensure it
is mixed well. Squeeze a small drop of control solution on a
clean nonabsorbent surface (such as a piece of wax paper).
Do not apply the control solution to your fi nger nor
directly to the test strip from the bot tle. Recap the
bottle immediately.
Immediately touch the
tip of the test strip to
the drop of control
solution. The solution is
pulled into the test strip
through the tip.
Hold the test strip in
the drop until the meter
beeps.
After the beep, you will see
the meter count down five
seconds until the test is
complete and your control test
result is displayed.
The meter will automatically
recognize and mark (
) the
control result for you.
NOTE: The
does not indicate
the control test result is within
the specifi ed range.
If your control test result is out of range, do not
use your meter for blood glucose testing until
you resolve the issue. See “What You Should Do”
on page 38.
Compare your control test result with
the Normal Control Range printed on
the test strip bottle label or on the
bottom of the test strip box.
NOTE: Low and High control
range values can be found
on the bottom of the test
strip box.
Control Solution Testing
To turn your meter off, simply
remove the test strip. The result
will automatically be marked with
a
and stored in the meter
memory.
Control results will not
be included in your 14 day
blood glucose average or in the
7 day total. They are also not
sent to your Medtronic device
(the result does not fl ash).
Carefully dispose of the used test strip.
84378888_CntrLINK_UG_EN_FpBp_v3.indd 22-2384378888_CntrLINK_UG_EN_FpBp_v3.indd 22-23 3/30/12 11:58 AM3/30/12 11:58 AM