
Owner`s manual


© 2013, Continuum Footspas, LLC April, 2013
Pedicure Chairs from
Continuum
®
Footspas
Unpacking
Continuum pedicure chairs require very little assembly.
Remove and discard all packing and lifting materials.
Installation Instructions
EVERY CONTINUUM PEDICURE CHAIR MUST BE INSTALLED BY A LICENSED PLUMBER AND A LICENSED ELECTRICIAN.
INSTALLATION MUST COMPLY WITH ALL NATIONAL, STATE AND LOCAL BUILDING CODES AND/OR REGULATIONS. FAILURE
TO COMPLY WITH THESE CODES AND/OR REGULATIONS WILL RESULT IN THE LIMITED WARRANTY BEING NULL AND VOID.
Install to Permit Access for Servicing
In order to ensure access after installation, please refer to installation drawings available at
ContinuumFootspas.com.
Extemely Important
Each pedicure chair MUST be anchored to the floor. This is especially critical if pedicure chair is grav-
ity drained with or without air gap. There are two (2) black mounting brackets supplied with each pedi-
cure chair for this purpose. Your warranty may be null and void if pedicure chair is not properly
secured to floor.
Installation Instructions:
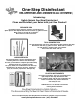
Step 1
Utilizing a level, carefully adjust the four (4) leveling feet. It is extremely important that your pedicure
chair is level. (Note: All leveling feet have been factory adjusted prior to shipment. In most cases no
further adjustment should be necessary). The entire pedicure chair may be raised or lowered slightly to
ensure the technician’s chair touches the front stainless steel guard and not the wood or Formica
®
.
Step 2
Mounting brackets are to be used on only two (2) of the four (4) main frame leveling feet. Slotted por-
tion of the mounting bracket fits between frame and the leveling foot (one in front, one in back, opposite
of each other). The flat portion with holes should be positioned to the floor. Use appropriate hardware
to secure to the floor (not supplied).
Location and Support
The floor structure must be level and capable of supporting the occupied pedicure chair. Please note
your pedicure chair must be installed at least eleven (11) inches away from a back wall to
ensure proper clearance for reclining seat back. Refer to installation drawings at
www.ContinuumFootspas.com.