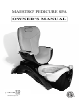
MAESTRO PEDICURE SPA ® OWNER’S MANUAL ® continuumfootspas.
MAESTRO PEDICURE SPA ® TABLE OF CONTENTS Introduction . . . . . . . . . . . . . . . . . . . . . . . . . . . . . . . . . . . . . . . . . . . . . . . . . . . . . . . . . . . . . . . . . . . . . . .1 Very Important Safety Precautions . . . . . . . . . . . . . . . . . . . . . . . . . . . . . . . . . . . . . . . . . . . . . . . . . . . .1 Maestro Specifications . . . . . . . . . . . . . . . . . . . . . . . . . . . . . . . . . . . . . . . . . . . . . . . . . . . . . . . . . . . . . .2 Limited Warranty . . . . .
MAESTRO PEDICURE SPA ® Introduction Everyone at Continuum™ Footspas sincerely thanks you for choosing The Maestro Pedicure Spa. We fully realize you had a choice and we look forward to exceeding your expectations. A tremendous amount of time and energy has gone into designing and manufacturing not only a beautiful looking pedicure spa, but a spa that will perform trouble free for many years. Please take a moment to read this entire owners manual before installation and use.
MAESTRO PEDICURE SPA ® Specifications Dimensions: 70.4” L (179 cm) x 36.2” W (92 cm) x 55” H (140 cm) Shipping Dimensions (Carton Size): 84” L (214 cm) x 40” W (102 cm) x 61” H (155 cm) The Maestro ships fully assembled. Net Weight: 310 lbs (141 kg) Shipping Weight without accessories: 408 lbs (185 kg) Shipping Weight with accessories: 463 lbs (210 kg) Client Weight Capacity: 300 lbs (136 kg) Basin Capacity: 5.9 US Gallons (22.3 liters) Power Requirements: 120V AC, 20 Amp, 60HZ.
MAESTRO PEDICURE SPA ® Limited Warranty IMPORTANT To validate The Maestro Limited Warranty, the Limited Warranty Registration Form MUST be filled out completely and returned to Continuum Footspas within 30 days of original installation. Continuum Footspas has designed and manufactured The Maestro Pedicure Spa to the highest standards.
MAESTRO PEDICURE SPA ® Very Important Requirements Every Maestro Pedicure Spa must be installed by a licensed plumber and licensed electrician. Installation must comply with all national, state and local building codes and/or regulations. The Maestro Pedicure Spa will not operate properly unless it has sufficient water pressure and temperature, proper drainage and adequate electrical power. Any inspections or approvals are the sole responsibility of the purchaser.
MAESTRO PEDICURE SPA ® Unpacking The Maestro Pedicure Spa requires very little assembly. In order to minimize potential damage, it was shipped with the chair portion attached to the main frame. DO NOT REMOVE CHAIR FROM BASE PORTION Remove and discard all packing and lifting materials. Installation Instructions EVERY MAESTRO PEDICURE SPA MUST BE INSTALLED BY A LICENSED PLUMBER AND A LICENSED ELECTRICIAN. INSTALLATION MUST COMPLY WITH ALL NATIONAL, STATE AND LOCAL BUILDING CODES AND/OR REGULATIONS.
MAESTRO PEDICURE SPA ® Important Utility and Installation Requirements and Instructions SAVE THESE INSTRUCTIONS Electrical Service A separate 120V, 60HZ, 20 amp GFCI protected grounded circuit MUST be used to supply power to each Maestro Pedicure Spa. Failure to do so renders the limited warranty null and void. NOTE: IF INSTALLED IN CANADA THIS UNIT MUST BE IN ACCORDANCE WITH THE CANADIAN ELECTRICAL CODE, PART 1.
MAESTRO PEDICURE SPA ® If you find it necessary to remove a factory installed drain pump, it is very important to follow all the instructions below. Please refer to our website at ContinuumFootspas.com and refer to diagram, “Plumbing Rough-In” and carefully follow all the following instructions: Step 1 Disconnect power to the Maestro Pedicure Spa. Step 2 Locate the black curved plastic shroud beneath the wood base. Remove the right side panel only.
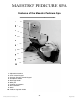
MAESTRO PEDICURE SPA ® Features of the Maestro Pedicure Spa 1 - Adjustable headrest 2 - Chair control keypad 3 - Acoustic Therapy Control Keypad 4 - Headphone holder 5 - Beverage holder 6 - MP3 jack 7 - Pivoting leg supports 8 - Basin overflow 9 - Shelf 10 - Pedicure log book holder © 2009, Continuum Footspas, LLC -8- August, 2009
MAESTRO PEDICURE SPA ® 11 - Sprayer 12 - Technician’s Control Keypad 13 - Drain Handle 14 - Temperature Control Handle 15 - NoPipe™ Jets 16 - Drain pop-up 17 - Removable foot massage rollers © 2009, Continuum Footspas, LLC -9- August, 2009
MAESTRO PEDICURE SPA ® Instructions Pertaining to a Risk of Fire, Electric Shock or Injury to Persons Important Safety Instructions WARNING - When using this unit, basic precautions should always be followed, including the following: 1. READ AND FOLLOW ALL INSTRUCTIONS. 2. WARNING: RISK OF ACCIDENTAL INJURY OR DROWNING, CHILDREN SHOULD NOT USE THIS PEDICURE SPA WITHOUT ADULT SUPERVISION. 3. Use this unit only for its intended use as described in this manual.
MAESTRO PEDICURE SPA ® SAVE THESE INSTRUCTIONS MAESTRO OPERATING INSTRUCTIONS NOTE: Please read these instructions carefully before operating this Pedicure Spa. CAUTION: To avoid injury and irreparable damage, always remain seated when using this unit. Never stand on or in the basin. SPECIAL WARNINGS ● If you have any concerns regarding your health, consult your doctor before using this pedicure spa.
MAESTRO PEDICURE SPA ® Technician’s Control Keypad (12) EXTREMELY IMPORTANT Never, under any circumstances, should one spray water directly on the Technician’s Control Keypad. This will damage the Control Keypad and void the limited warranty. FILL MODE IMPORTANT NOTE: In order to activate water flow, the Temperature Control Handle (14) MUST remain in any position except vertical. To add water to your spa simply press the “Fill” button. The basin will start filling with water.
MAESTRO PEDICURE SPA ® JETS Turn the NoPipe™ Jets on by pressing the “Jets” button. To turn the NoPipe Jets off press the “Jets” button again. NOTE: The NoPipe Jets will automatically shut off 45 minutes after continuous operation. You may reactivate the NoPipe Jets by pressing the “Jets” button. The jets can not be activated during the fill cycle. WARNING: DO NOT ATTEMPT TO OPERATE JETS WITHOUT WATER.
MAESTRO PEDICURE SPA ® DRAIN Your Maestro Pedicure Spa may be equipped with a factory installed, built in discharge pump (if ordered). To drain the water from the basin turn the jets off by pressing the “Jets” button and open the drain by turning the drain handle (13) clockwise. To begin the draining process, press the “Drain” button located on the Technician Control Keypad (12). The pump will begin draining water out of the basin.
MAESTRO PEDICURE SPA ® Client-Operated Controls CLIENT CHAIR CONTROL BUTTONS Your Maestro pedicure spa has dual control keypads for adjusting the client’s chair position during the pedicure. If it becomes necessary to adjust the chair position (move the chair forward, backward or tilt) the technician can utilize these buttons on the Technician Control Keypad (12) without disturbing the client. ADJUSTABLE HEADREST (1) The headrest has a built in counterweight that keeps it in position.
MAESTRO PEDICURE SPA ® EXIT This control was designed with the safety and convenience of your client in mind. In order to prevent accidental swiveling of the client chair, the chair is locked during the pedicure and can only move forward, backward or recline. After the pedicure is completed, press and hold the “Exit” button for two (2) seconds. The chair will then return to it’s “Home” position.
MAESTRO PEDICURE SPA ® INSTRUCTIONS FOR BUILT-IN MP3 PLAYER To ensure a wonderful and relaxing massage experience, please read and follow instructions carefully (refer to Diagram “A”). Step 1 Press on/off button on control keypad (3). Step 2 Press play/pause button. The Acoustic Massage system will start. Press the track control arrows to choose from numerous selections. Note: Press the play/pause button ONLY ONCE, pressing twice will pause musical selection.
MAESTRO PEDICURE SPA ® User Maintenance Instructions Cleaning and Disinfecting IMPORTANT YOU ARE REQUIRED TO CHECK WITH YOUR STATE BOARD FOR MANDATORY CLEANING AND DISINFECTING REQUIREMENTS AND PROCEDURES. The following procedures are important guidelines that will help in keeping your pedicure spa clean and trouble free for years. It is extremely important to clean and disinfect each and every pedicure spa after each pedicure, after the last pedicure of the day and once a week for overnight cleaning.
MAESTRO PEDICURE SPA ® End of Each Day Procedures 1. Remove the covers from both NoPipe™ Jets. No tools are required. Simply grip the cover and twist off. To replace, position covers on front of jets, twist and lock. 2. Clean the screens and the area behind it with a brush, liquid soap and water to remove all visible residue and replace properly cleaned screens. 3.
MAESTRO PEDICURE SPA ® Information about Disinfectants and Detergent Cleaners A. EPA registered liquid Disinfectants used in the salon: i. Must have words bactericidal, fungicidal and virucidal and Hospital or pseudomonacidal on the label. ii. Must be mixed, used, stored and disposed of according to manufacturer’s label instructions. *It is against Federal Law to use an EPA registered disinfectant contrary to its label. iii.
MAESTRO PEDICURE SPA ® Care and Maintenance of Wood, Basin and Upholstery Wood Surfaces Maintaining the beautiful wood finish of your Maestro Pedicure Spa is easy. Simply clean and polish with any good quality liquid or paste wax polish on a regular basis. While the wood finish is extremely durable and water resistant, it is advisable to wipe dry any water that may splash onto the wood. By doing so, one minimizes the occurrence of dried water spots as well.
MAESTRO PEDICURE SPA ® If You Don’t Read Anything Else, Please Read This! Tips for Getting the Most from Your Maestro® Pedicure Chair ● Always use a hand towel to cover and protect the footrest/leg support area. It will certainly help to keep your Maestro looking brand new. ● While we strongly recommend using an abrasive cleanser and a Scotch Brite® medium duty pad for cleaning the basin, DO NOT use this for cleaning the two adjacent leg supports. Doing so will damage the outer layer of the leg support.
MAESTRO PEDICURE SPA ® NOTES: Phone: 262 754 4900 Fax: 262 754 4901 Toll free: 877 255 3030 ContinuumFootspas.
MAESTRO PEDICURE SPA ® After Client Pedicure Cleaning Log Date (m/d/yr):_______________________________ Station #__________ Serial #______________ Service No. Client Time Staff Time Staff Time Staff 1 2 3 4 5 6 7 8 9 10 Date (m/d/yr):_______________________________ Service No. Client 1 2 3 4 5 6 7 8 9 10 Date (m/d/yr):_______________________________ Service No.