
User guide

Installation
Installation is a simple and direct process:
1. Set IP address information locally via RS-232
2. Set RS-232 COM port baud rate and data parameters locally via RS-232 or remotely over IP
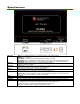
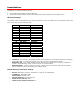
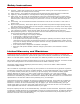
DIP Switch Settings
Use the DIP switch on the bottom of the unit for setup (turn IP-232 so switches are on the bottom of the case,
S1 is on the left, Up turns switches ON):
S1 Off Value On Value
1
2
3
4
5
6
7
8
*Values in gray cells are the default settings.
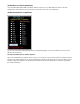
S2
• Command - Turn Switch 7 ON changes RS-232 from operation as a remote RS-232 port to receiving
setup commands via a Terminal program, turn off to return to remote RS-232 mode.
• Default RS-232 - Turn Switch 8 ON to operate RS-232 port at 9600 baud, no parity, 8 data bits, 1
stop bit, no handshaking. Switch to OFF to return to current settings.
• Default Settings – Turn S1 Switches 1-4 OFF, 5-8 ON, then all S2 switches ON, then reset power.
Sets to default IP, Telnet and RS-232 port settings below.
Default RS-232, IP and Telnet Settings
• RS-232: 9600 baud, no parity, 8 data bits, 1 stop bit, no handshaking
• IP Address:
192.168.1.232
Subnet Mask: 255.255.255.0
• Gateway Address: 000.000.000.000
• Telnet Port for RS-232: 4001
• Telnet Port for Setup Commands: 23
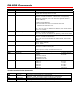
Off Value On Value
1
2
3
4
5
6
7 RS-232 Mode Command Mode
8 Current 9600, N,8,1