
Operation Manual


58
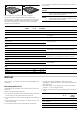
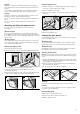
Cleaning the hook-in racks
You can remove the hook-in racks for easier cleaning.
ã=Risk of burning due to hot components in the cooking
compartment!
Wait until the cooking compartment has cooled down.
1. Push the hook-in rack upwards at the front and unhook to the
side (figure A).
2. Pull the hook-in rack forwards at the rear and unhook to the
side (figure B).
3. Clean the hook-in rack with washing-up liquid and a sponge
or brush.
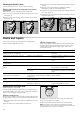
4. Align the hook-in rack with the indentation (a) facing
downwards, so that the shelf heights match.
5. Insert the hook-in rack at the rear as far as it will go and push
to the rear (figure C).
6. Insert the hook-in rack at the front as far as it will go and push
downwards (figure D).
Faults and repairs
In the event of a fault, check the tips in the following table
before calling the after-sales service.
ã=Risk of electric shock!
Work on the appliance electronics may only be performed by
an expert. Disconnect the appliance from the power supply.
Switch off the circuit breaker or take out the fuse in the
household fuse box.
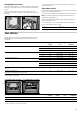
Replacing the oven light bulb
Replace faulty oven light bulbs.
You can obtain replacement light bulbs from customer service
or specialist retailers: E14, 220 - 240 V, 40 W, heat resistant to
300 °C. Only use these oven light bulbs.
ã=Risk of electric shock !
Disconnect the appliance from the power supply. Switch off the
circuit breaker or remove the fuse from the household fuse box.
1. Place a tea towel in the cold cooking compartment to prevent
damage.
2. Turn the glass cover anticlockwise and remove it.
3. Replace the oven light bulb with a bulb of the same type.
4. Screw on the glass cover again.
5. Remove the tea towel and switch on the circuit breaker.
Note: If the glass cover cannot be unscrewed: use rubber
gloves to turn it. You can order a special removal tool through
the after-sales service (order no. 613634)
A B
a
a
C D
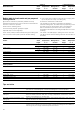
Problem Possible cause Remedial action
Electrical operation is malfunctioning (e.g.
indicator lamps do not light up)
Faulty fuse Check fuses in the fuse box and replace if
necessary
Liquid or thin dough runs to one side Appliance not installed level Check the appliance installation (see the
Installation instructions)
‹:‹‹ flashes in the clock display Electricity supply was cut Reset the clock (see section: Electronic
clock)
Electronically controlled functions are
malfunctioning
Energy surges (e.g. lightning strike) Reset the function concerned
Smoke is generated during roasting or
grilling
Fat is burning on the grill element Continue grilling or roasting until the fat on
the grill element is burnt away
Wire rack or universal pan inserted
incorrectly
Place the wire rack in the universal pan
and insert them together at a lower shelf
height
High levels of condensation are generated
in the cooking compartment
Normal occurrence (e.g. when baking
cakes with very moist toppings or roasting
a large joint)
Open the appliance door occasionally
during operation
Enamelled accessories have light, matt
marks
Normal occurrence caused by dripping
meat or fruit juices
Not possible
Door panels are misted up Normal occurrence caused by
temperature differences
Heat the appliance up to 100 ºC and then
switch off again after 5 minutes