
Instruction manual

20
Self-cleaning surface
The back wall of the cooking compartment is coated with self-
cleaning enamel. This coating absorbs and disintegrates
splashes from baking and roasting while the oven is in
operation.
Large splashes only disappear after the oven has been used
several times.
Discolouration on the rear wall does not affect the self-cleaning
function.
Caution!
Damage to surfaces on self-cleaning areas due to applying
oven cleaner.Never clean the self-cleaning surfaces with oven
cleaner.
If oven cleaner accidentally gets onto self-cleaning surfaces,
remove it immediately with a sponge and plenty of water.
Caution!
Damage to surfaces on self-cleaning areas due to the use of
abrasive and acidic cleaning agents and aids.
Do not use cleaning agents containing abrasive substances or
acids.
Do not use abrasive cleaning aids such as steel wool or
scourers.
EasyClean®
Your appliance comes with an > EasyClean® function to
make cleaning the cooking compartment easier. An
automatically controlled vaporisation of soapy water loosens
residues and makes it easier to remove them afterwards.
In the case of persistent dirt, you can
■ allow the soapy water to penetrate for a while before
switching on EasyClean
■ rub detergent onto the dirty surfaces before switching on the
cleaning aid
■ repeat the EasyClean® function once the cooking
compartment has cooled
Preparation and switching on
Only use EasyClean® when the cooking compartment has
cooled down. Allow the cooking compartment to completely
cool down.
: Risk of scalding and surface damage!
Never pour water into the cooking compartment when it is hot.
Water vapour will be created and the enamel may be damaged
because of the change in temperature.
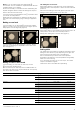
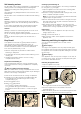
1. Remove the accessories from the cooking compartment.
2. Carefully pour 0.4 litres of water (not distilled water) with
some detergent into the base trough of the cooking
compartment (Fig. A).
3. Close the appliance door.
4. Switch on > EasyClean®.
The
r and > indicator lamps light up.
The
r indicator lamp goes out after about 4 minutes.
EasyClean® finishes after a further 17 minutes. A signal
sounds.
5. Turn the operating mode selector back to the Û position.
Cleaning up and switching off
Do not leave the remaining water in the cooking compartment
for a long time (e.g. overnight).
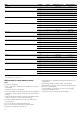
1. Open the appliance door and remove the remaining water
with an absorbent sponge cloth (Fig. B).
2. Clean the cooking compartment with a sponge cloth, a soft
brush or a plastic saucepan scrubber.
Note: You can remove any remaining, persistent residue with
a glass scraper for glass ceramic.
3. Remove limescale with a cloth soaked in vinegar, then wipe
with clean water and rub dry with a soft cloth. Remember to
dry under the door seal.
4. After cleaning, leave the appliance door ajar in the stop
position (approx. 30°) for approx. 1 hour to allow the enamel
surfaces in the cooking compartment to dry thoroughly.
Rapid drying
1. After cleaning, leave the appliance door ajar in the stop
position (approx. 30°).
2. Set 3 CircoTherm® at 50 °C.
3. After 5 minutes, switch off the appliance and close the
appliance door.
Removing and fitting the appliance door
You can remove the appliance door to clean it more
thoroughly.
: Risk of injury!
The hinges of the appliance door may snap shut with great
force. Always open the hinge locking lever fully when removing
the appliance door and close it fully after refitting. Do not reach
into the hinge.
: Risk of injury!
If the appliance door has only been unhinged on one side, do
not reach into the hinge. The hinge can snap back with great
force. Call the aftersales service.
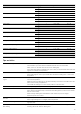
Removing the appliance door
1. Open the appliance door fully.
2. Open the locking levers on the left and right-hand side fully.
The hinges are secured and cannot snap closed.
3. Close the appliance door until resistance becomes
noticeable (figure A)
4. With both hands, grip the door on the left and right-hand side,
close the door a little more and pull it out (figure B).
$ %
$ %