
Installation guide

Pompeii Oven Instructions
© Forno Bravo, LLC 2007. All Rights Served. Ver. 1.2 24
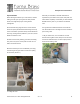
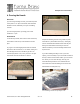
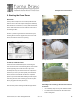
the long sides of the frame together using (2) 2”x4” studs
nailed cross the top of the frame, and 2”x4” studs set on
an angle to the ground. Check for level (Photo 3.4).
3.4 Form sides held in place with 2”x4”’s.
Tips and Hints
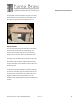
Cut your frame and plywood for the bottom of the hearth
form about 3/8" shorter than the actual opening. The
concrete will not escape when you pour, and it will be
easier to remove the form when your hearth has cured.
Use shims to set the bottom form level with the top of the
block stand. It will be easier to make the form level with
the top of the stand, and it is easier to remove it when the
hearth has cured.
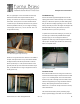
To stop the top form from bulging out under the weight of
the concrete, use either (2) 2"x4"'s nailed in place on the
top of the form in one direction, and nailed in place and
angled to the ground in the other direction. Or, use
ratcheting cargo straps tightened around the outside of the
top form.