
User`s manual


64
• Disconnect the console cable from the console board.
• Fix back the new console cable on the console board.
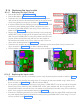
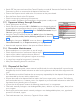
• Route the cable through the slot provided on the base unit front cover as shown in Figure 128 and fix
the console assembly to the front cover with 4 M3x16 self tapping screws using phillips screw driver as
shown in Figure 127 .
• Execute the steps in "8.2.2.5 Base unit Covers Fixing:".
• Perform "5.12 Power On Check:".
9 General Service & maintenance
9.1 Cleaning and disinfecting (if required)
• Switch OFF the Unit.
• Use a soft cloth damped in a mild soap solution for cleaning the outside surfaces of the unit.
• Do not spray or let the cleaning fluid enter the unit. Disinfect with a compatible low or intermediate
level instrument grade disinfectant after cleaning. Use a non-acetone based disinfectant liquid. Very
mild detergent is recommended for cleaning the equipment.
9.2 Tube Head Re-Calibration
The X-ray Tube Head requires re-calibration in the event of the following operational faults:
OvermA
FilamentOpen
FilamentLimit.
• Place the Power Switch to the OFF position and wait till the Control Console display is turned off.
• Remove the exposure switch cable from J3 connector on the power board from the bottom side of the
base unit.
If Console board cable fails:
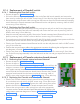
• Remove the console assembly from the base unit front cover by removing 4 M3x16 self tapping screws
using star screw driver as shown in Figure 127 and Figure 128 .
Figure 128
Figure 127