
User`s manual


32
5 Installation of intraskan dc
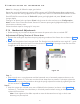
Step 3:-
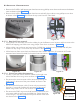
• Keep the vertical arm in horizontal position and horizontal arm in vertical position as shown in the Fig-
ure 39 (illustration 3). Both the arms should stay in position without moving. In this position the hori-
zontal arm is in locked position and no adjustments are required for the horizontal arm. If the vertical
arm is unstable adjust the vertical arm spring by loosening (by loosening the slotted nut) using screw-
driver through the spring adjustment window as shown in Figure 37 .
Movement Check-1:
• Move the scissor arm very slowly in small increments from step 3 to step 2 position as above and then
move back similarly from step 2 to step 3 position in small increments . The scissor arm should stay
stable without drooping at all positions.
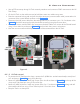
• If it droops, tighten the vertical arm spring using screwdriver through the spring adjustment window (by
tightening the slotted nut as shown in Figure 37 ). Once it reaches Step 3 position, if the Vertical arm
moves up (unstable) then adjust the vertical arm spring by loosening (by loosening the slotted nut as
shown in Figure 37 ) using screwdriver through the spring adjustment window. Repeat the “Movement
Check-1” procedure to reconfirm or fine tune adjustments.
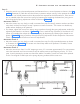
Movement Check-2:
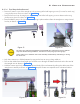
• Move the scissor arm very slowly in small increments from step 3 to fully expanded position as shown
in illustration 4 of Figure 39 . The scissor arm should stay stable at all positions. If unstable, Scissor
Arm need to be replaced.
Movement Check-3:
• Move the vertical arm from 0° to 90° stopping at every 10° increment approximately. For every position
move the horizontal arm from one extreme end to another extreme end stopping at every 10° incre-
ment. At each position the scissor arm should be stable. If unstable, Scissor Arm need to be replaced.
Fix the 2 rectangular S-ARM caps to the spring adjusting windows of the scissor arm.
Figure 39: Scissor Arm movement check