
User`s manual


31
5 Installation of intraskan dc
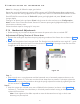
Note: For changing kV follow the steps given below:
Restart the unit and while starting press the UP/Increment and DOWN/Decrement Keys simultaneously
within 2 seconds after the logo appears which changes the screen to "CONFIGURATION MENU" screen.
Press DOWN/Decrement button till "Select kV" option gets highlighted and press "S/mA" button kV
change display.
Change kV to desired value and press "S/mA" which saves the value and returns to "Configuration
Menu" screen. Press "Down/Decrement" button till Continue option gets highlighted and press "S/mA"
which returns to Home screen.
Follow the above steps for changing kV every time.
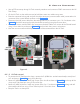
Note: If over tightened, the effort required to move the horizontal arm is high in which case
loosening may be required.
Figure 38
Figure 37
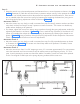
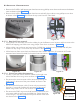
5.14 Mechanical Adjustments
• Before starting any mechanical adjustments ensure the power to the Unit is switched OFF.
Adjustment of Spring Tension of Scissor Arm:
• Remove the rectangular caps from the spring adjusting windows of the Scissor Arm as shown in Figure
37 .
• Check the Straight-Arm level using sprit level. The Straight-Arm end should be at an angle of 1° gradi-
ent approximately above the base unit end as shown in Figure 38 . If the angle is less then check the
Straight-Arm & the Base Unit for wear out.
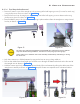
Step 1:-
• Keep vertical arm in vertical position and the horizontal arm in horizontal position as shown in the
Figure 39 (illustration 2). The scissor arm should not droop from its position. If it droops, tighten the
horizontal arm spring using screwdriver through the spring adjustment window (by tightening the slot-
ted nut as shown in Figure 37 ).
Step 2:-
• Keep the scissor arm with both arms vertical (folded /locked position) as shown in the Figure 39 (il-
lustration 1). The Scissor Arm should stay in its locked position without moving or drifting. If unstable,
replace the Scissor Arm.