
User`s manual

14
5 Installation of Intraskan DC
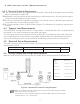
5 Installation Procedure Summary
This section provides the instructions necessary to install the Wall Mounted Intraskan DC. Install the Intra-
skan DC by performing the tasks summarized below and provided by the following pages.
1. Unpacking.
2. Base Unit fixing using Wall Mounting Options
a. Single stud (4" x 4") Installation.
b. Two stud (16" on Center) Mount Installation.
3. Input wiring.
4. Install the Straight Arm onto the Base Unit.
5. Install the Scissor Arm with Tube Head onto the Straight Arm.
6. Scissor-arm cable connections.
7. Remote console Configuration(If required)
8. Perform operational check procedures to make sure the Intraskan DC operates properly after installation.
Remove all the sub assemblies from the packing box and keep them on the plane surface.
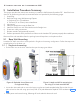
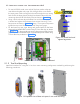
5.1 Base Unit Mounting
Intraskan DC Wall mount Unit comes packed in Single stud mounting configuration. Follow the steps men-
tioned below to fix the base unit.
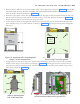
5.1.1 Single stud mounting:
• Fix the base unit on the 4"x4" wood stud as per the steps given below:
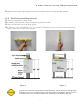
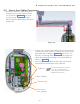
Figure 9: Mark and drill 4 mounting ho-
les using 5/16-inch wood drill bit.
• Locate the 4x4 wood stud to mount the base unit plate and mark template holes (Ensure that the tem-
plate is level on the wall using spirit level). Drill 5/16" pilot holes to the depth of 3.93" as shown in Figure
9 .
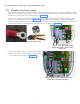
• Install power and control wiring, following all local codes for electrical work.
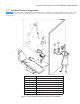
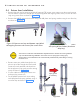
Figure 8: Exploded view of base unit
insinglestudxing