
Installation manual


2–60 Hardware installation
Preparing and Installing Button Labels
A sheet of general purpose button labels printed on transparent film (part no. 32–047294–001) is included with each Sat-
urn console. The category names (CAM, NET, etc) are offset to allow numbers to appear below the category name. (Fac-
simile pages of the label set are found in Appendix C of this manual.)
These labels are designed for installation in the Source Assign & Memory button group, which includes the eight Quick
Pick keys and the 20 category/number selection keys. Software configuration for these buttons is discussed in Section
3 of this manual (pages 3–46 and 3–62). It is suggested that you complete the software configuration process before
installing the labels.
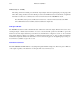
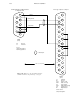
The button caps are removed using a small screwdriver (or a fingernail). Use the small slot between the clear cap and
the black portion of the button; the slot can be found along the top or bottom of the button housing.
Note: A good technique is to use a corner of the tip of the screwdriver and a fingernail in the same slot. Be
prepared for the cap to come off suddenly!
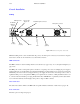
The diffusing screen inside can be used as a size guide when creating custom labels. For best results, the labels should
be prepared as transparencies (such as those used for overhead projectors). Because of its opacity, bond paper for the
labels is not recommended.
Cleaning the Console
To avoid scratching the surface, the top of the console should be cleaned only with 91% isopropyl alcohol and a very
soft cloth.