
Installation manual


Hardware installation2–55
Configuration of CE 300
This step is required if alphanumeric mnemonics are desired for display on the “Select” button group or on a CP 320
backup control panel. If this step is not performed, the AAB/DAB 3500/4000 Backup Switcher will still operate but the
backup control panel window will display numerics only.
The CE 300 is configured using an editor that is completely outside the normal Saturn/Jupiter menu structure. This editor,
referred to as the “Configuration Editor,” is described in a separate manual entitled CP 300 Series Control Panels / CE
300 Control Boards, part no. 04-045227-002.
Proceed as follows:
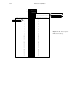
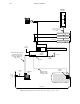
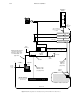
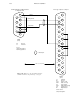
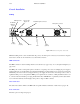
1. Connect the backup switcher Config port to the COM1 (preferred) or COM2 serial port of the PC download com-
puter (as shown on pages 2–53 and 2–54). For cable details, see page 2–56.
2. Install Configuration Editor software on the file server (as described in Section 3 of the CP 300 Series Control Pan-
els manual).
3. Build a configuration set with mnemonics, then compile and download it to the CE 300.
Special guidelines for this configuration (not discussed in the CP 300 Series Control Panels manual):
a. For “Select Switcher Type,” specify binary protocol.
b. Only the first level in the Switcher Levels table, which is defined as VID, needs to be defined. The hardware
does not allow splitting the video and audio levels.
c. Although the backup switcher has 16 inputs, the “Select” button group on the Saturn console only has 15 but-
tons, allowing no access to the 16th input. With the CP 300/10/20/30 panels, all 16 inputs are available.
d. When defining the Switcher Input table, the 8 character name defined in the NAME field will be the name
that will be displayed on the Select button group’s display.
e. The Switcher Output table must be defined, even though only one output exists.
f. The Select button group will control the output that is set on its internal DIP switch, which is normally output
zero (Step 9 on page 2–37 of this manual). The CP 300/10/20/30 panel is similar (Step 10 on page 2–37).
g. On the CP Button Groups table, make sure all inputs are assigned to Group Zero.
Since the Select button group has only 15 buttons, a CP Button Group table for this panel will need only 15
input sources.
h. On the CP Button Assignment table, if the Select button group is being defined, use “CP 300/330” as the panel
type. Regardless of panel type, assign the panel to Button Group Zero.