
User manual


9
2n
d
Da
y
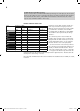
In the Advent calendar today
•1x board
(
SYB 46
)
•1x
j
umper cable
Measurin
g
analo
g
ue value
s
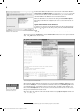
Today, you will program a Sketch in the Arduino IDE to read
out the values of an analogue input. The values will be graphi-
cally displayed by text output.
C
omponents: 1x board, 1xjumper cable (male – male
)
T
h
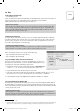
e progra
m
The program
f
or this day is called
T
ag02.
i
no an
d
l
ocate
d
in
d
irectory
T
ag02 wit
h
in t
h
e
d
own
l
oa
d
arc
h
ive
.
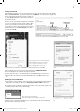
The
j
umper cable serves as an antenna. Tr
y
measurements without its cable as well, to see i
f
the cable makes a difference to your measuring environment
.
int analo
g
Value = 0
;
int analogPin = A0
;
v
oid setup()
{
pinMode(analo
g
Pin, INPUT)
;
Serial.begin(9600);
}
v
oid loop
()
{
analogValue = analogRead(analogPin)
;
Serial.println
(
analogValue
)
;
delay
(
1000
);
}
How t
h
e pro
g
ram wor
ks
int analo
g
Pin = A0
;
First, the pin number used is specifi ed in the variable
a
nalo
g
P
in
.
A
ll
pro
g
rams in t
h
e Ar
d
uino IDE are
made up at least of the two functions
s
etu
p
a
n
d
loo
p
:
v
oid setup
()
{
pinMode(analo
g
Pin, INPUT)
;
Serial.begin
(
9600
);
}
Th
e
f
u
n
ct
i
o
n
s
e
t
u
p
runs once initially and is usually used for confi guration. The analogue pin is specifi ed
as t
h
e in
p
ut.
S
erial.be
g
in(9600
)
starts seria
l
communication in or
d
er to
d
isp
l
ay va
l
ues on t
h
e seria
l
monitor and the serial
p
lotter. The
p
arameter in this function is the Baud rate.
v
oid loo
p()
{
...
}
The
f
unction
l
oo
p
is repeated until the power supply
is disconnected or the reset button
p
ushed
.
v
oid loo
p()
{
analo
g
Value = analo
g
Read(analo
g
Pin);
Serial.println(analo
g
Value)
;
delay(1000);
}
analo
g
Rea
d
saves the value of the analo
g
ue input in
t
h
e
v
a
ri
ab
l
e
a
nalo
g
Value and out
p
uts it via
Se
ri
al.
p
rintl
n
.
dela
y
(1000
)
makes the pro
g
ram wait for
1
000
milli
seco
n
ds.
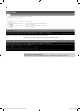
Now, o
p
en the serial monitor via T
oo
l
s
/
Se
ri
a
l M
o
ni-
tor
. You can see the measured value there. You can also have the values displayed graphically. For this,
connect the previously opened serial monitor and open the serial plotter via Tools/Serial
p
lotte
r
.
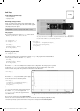
The data rate must be set correctly in the dropdown in the lower right corner of the window, in this case
9600
B
aud
.
2. Da
y
15007-3 Conrad Adventskalender Internet of Things 2017_en.indd 915007-3 Conrad Adventskalender Internet of Things 2017_en.indd 9 13.08.2017 17:03:0113.08.2017 17:03:01