
User manual


20
C
ontro
ll
in
g
t
h
e piezo wit
h
t
h
e Ap
p
I
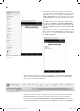
n order to control the IoT-board with an App, you need a Sketch on the board that reacts
to the commands from the App and an App. Today, we want to control the enclosed piezo
with an App. The Sketch you need for this is Ta
g
08.in
o
in the directory
T
a
g
0
8
.
Load this
Sketch onto the IoT-board.
The Sketch is based on the alread
y
-used
fi
le Vorlage.in
o
. The
p
rinci
p
le o
f
all Sketches in
this Advent calendar that react to the App is as
f
ollows: A text is sent throu
g
h the wireless
i
nter
f
ace, which is evaluated in the Sketch,
f
ollowed b
y
execution o
f
an action. It works
the same wa
y
in the other direction: The App will receive a text from the IoT-board via the
wireless interface, evaluate the text and then perform a correspondin
g
action. The com
-
m
and to pla
y
a sound is Sound:
if (Text.startsWith(“Sound”)
||
Text.startsWith(“SOUND”)
||
Text.
s
tartsWith
(
“sound”
))
{
playMelody();
}
The associated App is contained in
fi
le p
i
ezo.a
ia
. Import the
fi
le into AI2
.
I
mport
i
n
g
pro
j
ects
i
nto
AI
2
All Apps are provided as aia-fi les ready for use in the download archive. In order to
open a fi le in AI2, you must import the project fi le via the menu item
P
ro
j
ects
/I
mpor
t
pro
j
ect
(
.aia
)
from my computer ...
.
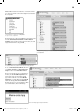
Function o
f
the App
The
f
ollowing Apps that were created with AI2 are built based on a template; there
f
ore,
this App is now described precisely and re
f
erred to in the
f
urther course. The App is made
up
of four areas in total:
•
Co
nn
ect
i
o
n
a
r
ea
•F
u
n
ct
i
o
n
a
r
ea
•A
pp
info area
•Interna
l
, invisi
bl
e area
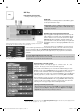
The le
f
t
fi
gure shows the individual areas o
f
the App. The connection area includes
C
ontainer_Ver
b
in
-
d
un
g
an
d
C
ontainer_MA
C
. The actual App, which changes
f
rom project to project, is located in the
C
ontainer_Ap
p
.
This container contains the function area
(
b
uttonTon
)
and the App information area
(
Container_App_In
f
o
)
.
Wh
at
i
s
a
co
n
ta
in
e
r?
You can place
y
our elements usin
g
various la
y
out mana
g
ers in the cate
g
or
y
La
y
ou
t
(e.g.
t
H
o
riz
o
n
ta
lAr-
r
an
g
ement); these help
y
ou with horizontal and vertical placement. The elements are placed within
this kind of la
y
out mana
g
er. Since these la
y
out mana
g
ers usuall
y
contain several elements, the
y
are
c
alled containers (la
y
out containers)
.
C
han
g
in
g
component names
If
you add components to an inter
f
ace in the AI2, the component swill receive an automatically gene
-
r
ated name. In contrast to the other properties o
f
a component,
y
ou cannot chan
g
e names in the win-
do
w Pro
p
ertie
s
,
but need to use the area
C
om
p
onents for this. Here,
y
ou can select the correspondin
g
c
om
p
onent and click the button
Re
n
a
m
e
.
The interface contains three invisible components in total. For use of Bluetooth,
y
ou need the component
Bl
uetoot
h
C
li
e
n
t
from the category
t
C
onnectivit
y
.
The component is onl
y
pulled into the interface area
and does not require an
y
further confi
g
uration. To select the correspondin
g
Bluetooth device, the compo
-
n
e
n
t
Activit
y
Starte
r
(in the u
pp
er screen
W
enn
_
BT
_
An
)
from Connectivit
y
is needed. The Activit
y
Starter
is assi
g
ned the value
a
ndroid.Bluetooth.ada
p
ter.action.REQUEST_ENABL
E
in
t
h
e
win
do
w Pro
p
ertie
s
.
F
o
r
continuous verifi cation of the wireless connection, the element
C
lock
(
in the upper fi
g
ure
T
imer
)
from
S
ensor
s
is used. The
T
imerInterval is set to
200
in window Pro
p
erties
.
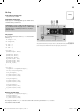
T
he upper area o
f
the App shows whether the Bluetooth
connection
h
as
b
een esta
bl
is
h
e
d
or not
.
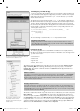
All components contained in the App
in a hierarchy overview. The most
important components have been given
indicative names.
15007-3 Conrad Adventskalender Internet of Things 2017_en.indd 2015007-3 Conrad Adventskalender Internet of Things 2017_en.indd 20 13.08.2017 17:03:0813.08.2017 17:03:08