
User manual


19
T
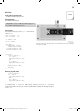
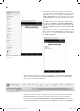
ext to. Either insert the element twice or insert the element
once and copy it via the context menu (right mouse button) o
f
the com
p
onent
.
Com
p
onents
h
ave a context menu. Use Du
pl
icate
to copy t
h
e se
l
ecte
d
component.
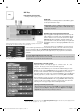
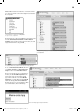
Now insert the two components within the previously inserted
elements
(
wh
e
n B
utto
n1.T
ouc
hD
o
wn
a
n
d
wh
e
n B
utto
n1
.
T
ouchU
p
)
. Now
y
ou still need text content. For this, select the
empty element from the category
Te
x
t
(top-most element).
t
The element with the two quotation marks is used
f
or changing the label
.
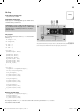
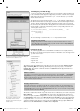
In
case
of
wh
e
n B
utto
n1.T
ouc
hD
o
wn, the text is
set
to
Status
: T
ouc
h
ed
. F
o
r wh
e
n B
utto
n1.T
ou-
chU
p
, the text is set to
Status
: N
ot
touc
h
ed
.
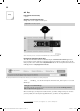
Now
y
ou can test t
h
e app on
y
our Smartp
h
one.
For t
h
is, se
l
ect Connect/AI Com
p
anio
n
in t
h
e
menu. Now a text co
d
e an
d
a QR-co
d
e wi
ll
a
pp
ear. Enter either the code in the
MIT AI2
Com
p
anion or scan t
h
e QR-Co
d
e wit
h
scan Q
R
code
. Start t
h
e A
pp
wit
h
co
nn
ect
wi
th
Code
.
Now t
h
e App opens on your Smartp
h
one. W
h
en
y
ou touc
h
t
h
e
b
utton, t
h
e text wi
ll
c
h
an
g
e
.
T
his is how simple App development with AI2 is.
For programming the logic, you can go to the selection via categories
(
Bui
l
t-in
)
or via the com
-
ponents
(
S
creen1
)
.
T
he text of the label is adjusted when the button is touched.
15007-3 Conrad Adventskalender Internet of Things 2017_en.indd 1915007-3 Conrad Adventskalender Internet of Things 2017_en.indd 19 13.08.2017 17:03:0713.08.2017 17:03:07