
User manual


12
5th Day
In the Advent calendar toda
y
•1x LED green with dropping resisto
r
T
ra
ffi
c li
g
ht
T
oday’s project is a tra
ffi
c light that is created with the graphi-
cal development inter
f
ace Snap!
.
C
omponents
:
1x board, 1xLED green with dropping resistor,
1
xLED yellow with dropping resistor, 1xLED red with drop
-
pi
ng res
i
stor, 1x
j
umper
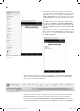
I
nsta
ll
ing Snap! an
d
preparing t
h
e IoT-
b
oar
d
Snap! is a graphical development inter
f
ace that exists speci
fi
-
cally
f
or Arduino as well in the
f
orm o
f
Snap4Arduino. Down-
l
oad the so
f
tware version used
f
or this calendar
f
rom
h
ttp://
www.
b
uc
h
.c
d
5. A
f
ter installation, switch the inter
f
ace lan
-
guage to German. For this, click the settings icon
(
cogwheel
)
in
Snap4Ar
d
uino an
d
c
h
oose t
h
e
l
anguage
G
erman in t
h
e menu
L
anguage
.
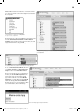
I
n or
d
er to
b
e a
bl
e to use Snap4Ar
d
uino on your
b
oar
d
, you
nee
d
to insta
ll
a specia
l
S
k
etc
h
on your
b
oar
d
: Firmata. For t
h
is, connect t
h
e IoT-
b
oar
d
to your PC
a
n
d
open t
h
e Ar
d
uino IDE. Se
l
ect Fi
l
e/Examp
l
es/Firmata/Stan
d
ar
d
Firmat
a
an
d
d
own
l
oa
d
t
h
e
S
k
etc
h
to t
h
e
b
oar
d
b
y c
l
ic
k
ing t
h
e arrow to t
h
e rig
h
t. Now you can program t
h
e
b
oar
d
wit
h
Sna-
p4Ar
d
uino
.
D
o not use Arduino IDE and Sna
p
! at the same time
T
he Arduino IDE and Sna
p
! cannot be used at the same time. Therefore, close the res
p
ective other
p
rogram before you work in the desired environment
.
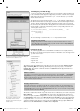
I
mp
l
ementin
g
a pro
g
ram in Snap
!
A program is assem
bl
e
d
in Snap! wit
h
grap
h
ica
l
e
l
ements t
h
at are
d
ivi
d
e
d
into
categories. The category menu can be
f
ound in the upper le
f
t.
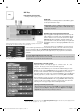
N
ow pull the element with the green colour into the middle working area
f
rom
C
ontrol. Use the element Set digital pi
n
in order to switch the LEDs on and o
ff
. Set
t
he values via the switchable element
t
rue
f
rom
O
perator
s
.
To prevent the pro
-
gram
f
rom ending, you need the loop element
f
rom Control. To keep the LEDs
f
rom
s
witching again at once, include a break o
f
one second using wa
it
f
rom Contro
l
.
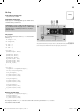
B
efore startin
g
the pro
g
ram,
y
ou need to connect the IoT-board to Snap!. For this,
cl
i
ck
the
ele
m
e
n
t
Co
nn
ect
to
Ar
du
in
o
in t
h
e cate
g
or
y
Ar
du
in
o
. W
h
en c
l
ic
k
in
g
t
h
e
sy
mbol,
y
ou will see the available connections. Select the
fi
rst connection. Now
click the
g
reen arrow
(
upper ri
g
ht
)
, and the traffi c li
g
ht will start
.
O
pening an externa
l
project in Snap!
T
he program
f
or today is located in
f
older
T
ag05
.
Go to the
fi
rst symbol in the
m
enu
b
ar an
d
se
l
ect
I
mport..
.
.
Navigate to the
f
older
T
ag05 an
d
se
l
ect tag
0
5
-
s
nap.xm
l
.
T
h
e project is now open an
d
you can use it.
5
Y
ou
ca
n
a
l
so
do
wnl
oad
t
h
e
l
atest
v
e
r
s
i
o
n fr
o
m http://snap4arduino.or
g/
.
The interface ma
y
deviate sli
g
htl
y
from the
screen s
h
ots,
b
ut t
h
e programs s
h
ou
ld
wor
k
t
h
e same
.
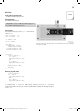
Starting at three LEDs, things get a little crowded, so that GND is separately connected to the
upper strip. LEDs
f
rom the le
f
t to the right: green, yellow and red.
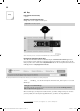
Th
e category Ar
du
in
o
co
n
ta
in
s
t
h
e
e
l
e
m
e
n
ts
fo
r
contro
ll
ing t
h
e IoT-
b
oar
d
.
T
he program created in Snap!
.
5. Da
y
15007-3 Conrad Adventskalender Internet of Things 2017_en.indd 1215007-3 Conrad Adventskalender Internet of Things 2017_en.indd 12 13.08.2017 17:03:0213.08.2017 17:03:02