
User manual


really a problem as long as the contact on the left of the image is plugged firmly into the board.
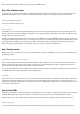
The current climate data in the browser
After you upload the programme, you can now open the website. You see three values that are represented as text and as bars. You can now
calibrate the values somewhat with the potentiometers. The temperature value, especially, should be compared to a thermometer and adjusted.
That's the only way to ensure that the information on the website is more or less accurate.
Day 19: Configuration page for the NanoESP
Behind today's door is another cable. With the two cables it's possible, for example, to place the RGB LED apart from the board. We'll need the
RGB LED today because the test is about a website with which you can adjust its colours. But that's not the main aspect: To make the
configuration of the NanoESP board especially easy not just for programmers, there is a configuration page through which the WLAN data of the
module can be adjusted. But first to the set-up. You see it in the following picture.
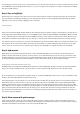
The RGB LED with all three series resistors
When you've loaded the programme in the board, you can call up the module's webpage. Because you're acting today as if the board didn't
already know your WLAN data, the path through the access point is useful. So connect to the NanoESP network. After connecting, call up the IP
address 192.168.4.1 in the browser. You reach the main page of the board, through which you can adjust the colours of the RGB LED. But follow
the link to the configuration page.
Now at the bottom of the configuration page, you'll see a text box, in which the text "Scanning ..." appears after a short time. The board now
searches for networks in range and conveys the networks with the strongest signals through the connection to the website. You now see the
message "Done" in the text box. In the field "SSID" you can now select your network. If it wasn't found, e.g. because your network is hidden, you
can also enter the name manually. In the text field underneath comes the network password.
In the lower boxes you can also enter another name for the access point network and set a password (minimum eight characters). But be careful:
If you enter the wrong home network data and give the access point network a password that you then forget, you've got a problem. Then you
first have to upload another programme with the right network data or an open access point before you can access the web server of the board
again.
Day 20: MQTT (Message Queue Telemetry Transport)
For the last days of this Advent, you'll now become familiar with a subject that plays a large role in the realm of the IoT. We're dealing with the
messaging protocol MQTT, which was specially developed for the communication from machine to machine (M2M). The protocol is thus so
brilliant because e.g. control data, measurement data or texts can be exchanged very easily and compactly. The overhead (data that's transferred
alongside the actual user data) is much lower than with HTTP and can be processed readily even by embedded devices, meaning microcontrol-
lers like our NanoESP. At the same time, the controller doesn't constantly have to establish a connection and query whether there's been a
change; instead, the connection is continually maintained and the client automatically gives information about changes.
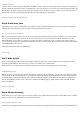
A so-called broker forms the basis for the communication. A broker is a server application that processes all data. A device can now connect to
the broker and "publish" messages, i.e. send them to the broker. Another device can "subscribe" to specific topics and then immediately receives
a new message published to this topic delivered by the broker. So that you don't have to set up your own broker, a public broker has been set up
for you at the address broker.fkainka.de.
The MQTT broker delivers the messages.
The topics are structured hierarchically, where subtopics are each separated with a slash. There are also so-called wild cards. With a "+" or "#"
you can subscribe to multiple topics at the same time. Publishing with the wild cards "#" or "+" isn't possible, however. For example, the topics
MyHome/Kitchen/Temperature
MyHome/Bathroom/Temperature
can thus be received at the same time by subscribing to the topic
MyHome/+/Temperature