
User manual


around and trying out various colours. You can even get white if you move the circle to the top left corner. The three numbers above also give the
current PWM value of the pins D3, D5 and D6. This time, too, you can conceivable use the programme for a living room lamp with mood lighting
that can be controlled via app.
Day 11: Day- and nightlight
Behind today's door is a 10-kohm resistor, but we don't need it yet today. Instead, the set-up from yesterday's test works today as well. In this
project, you'll build a day-night lamp that changes colours at specific times. Thus you can have a bright light shining during the day, while at
night only a dim red serves as emergency lighting for a bit of orientation.
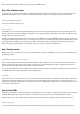
The layout from Day 10
When you've transferred the Blynk interface via QR code and downloaded today's programme, changed it and uploaded it to the controller, you
can already get started. On the Blynk interface, you see two ZeRGBa elements, which are labelled "DayLight" and "NightLight." When you switch
to day or night mode with the outside buttons below the ZeRGBa elements, the corresponding colour of the element is shown. But you can also
automate the switch between day and night mode. To do this, tap one of the two timer elements directly below the colour selection elements.
Here, while the interface is not started, you can select a time at which the mode should be switched. All you have to adjust is the start time. The
same applies for the other timer element. At the selected time, the mode switches over, and the LED changes from the day colour to the night
colour or vice versa. You don't even have to have the app open at those times. The Blynk server regulates the switch-over automatically.
Day 12: Light monitor
Behind today's door, you'll find a phototransistor. This is a sensor with which the brightness can be measured. You'll do that today, but in
addition to simple measurement, the project also sounds an alarm as soon as limit values that you've pre-set in the app are exceeded. So that
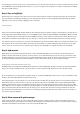
everything will function, you have to connect the sensor with a voltage divider circuit at Pin A0, as shown in the picture below. Pay attention to
the correct polarity of the phototransistor (short leg to VCC). It does also work the other way round, but not nearly as sensitively.
The phototransistor in voltage divider circuit with a 10-kohm resistor
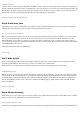
The Blynk interface looks pretty full today. Many different functions are realised with widgets. Through one of them, represented by the Twitter
bird, you can connect your Twitter account to the project. This is one of the channels through which you can receive an alarm message.
There's something more to do in the Arduino programme today, too. In addition to WLAN data and token, you can enter an email address today.
That's the other channel through which an alarm message is sent.
If you start the interface now, you'll already see a row of measured values scrolling above the topmost element. You can follow the progression of
values with the line. If you pass your hand over the sensor, the measured values become significantly lower. Using the sliding switch directly
below the measured values, you can set limit values that must not be exceeded or fallen below. At the bottom, there's also a blue and a white
button. With these, you can activate or deactivate the reporting via Twitter or via email. The LED next to the respective symbol shows the current
status. If a measured value leaves the allowed range, the system goes into an alarm state and sends a message. A terminal in the centre also
gives information about current events. You can also set a new message text using the terminal. Thus you're always up to date on whether e.g.
your plants are getting enough light.
Day 13: Alarm system with push messages
Today's project deals with a simple silent alarm system with password input for resetting the alarm. So that you get anything at all from the
alarm, the board sends a push message to your smartphone. We'll set the tilt sensor that's behind today's door as a motion detector. It can give
information about vibrations and thus inform you if someone tips the NanoESP board.