
User manual


data in the programme.
But first you need to download today's programme from the website www.iot.fkainka.de. When you've opened the programme in the Arduino
IDE, you will see at the very first two DEFINES. This is where you have to enter your WLAN name and the password. Only then can you upload
the programme. You can now check the status of the WLAN connection on the serial monitor. In the ideal case, you'll see "WLAN Connected"
there. The LED D3 also lights up. If you run into problems, you'll find help on the website.
After the connection, yet more messages appear on the serial monitor. First, the IP address of the board is given once. It was assigned to the
NanoESP by the router and is the board's address in the local network. After that, the board pings a server on the Internet to test whether it is
connected to the Internet. If everything functions, a suitable message appears on the serial monitor and the answer time in milliseconds that
passed from the sending of the ping to reception of the answer. You may recognise this ping value from online games. The connection to the
Internet now exists, and you are ready to take larger steps with the board.
Connection successfully created
Day 5: Blynk
You already established a first connection from the board to the Internet yesterday. In the coming days, this connection should be used
effectively. So we're looking at the online platform Blynk, through which short commands, measurement data or messages can be exchanged
between the NanoESP board and your smartphone.
Blynk enables the simple control of various IoT boards, e.g. the Raspberry Pi or our NanoESP, using an app. You can put the graphic interface
together completely on your own, and programming is also extremely simple. As if that weren't enough, you can even control the board from
anywhere in the world. So it's totally within the sense of the Internet of Things.
For your first test, you need the LED that's behind today's door and the resistor from yesterday. We want to switch the LED using the smartphone
or tablet. Set up the circuit shown here on the breadboard. Pay attention to the correct polarity of the LED (small leg at GND).
In the next step, you need to install the Blynk
library. You'll find a functioning version linked on the website (http://iot.fkainka.de/day5-2016) for today's test.
Integrating this library is somewhat more complicated, since there are multiple library files in the ZIP folder. That means: You have to install it
manually. But that's not particularly hard. Simply open your Sketch file folder. If you don't know exactly where it is, look under File > Presets.
In the Sketch folder is a folder named libraries. You need to copy the folder contained in the ZIP file into this folder. These are basically the steps
the Arduino IDE took automatically on
Day 2 when installing the NanoESP library. That's why you'll also find a subfolder named NanoESP in the libraries folder. You should now
likewise be able to find the folder from the downloaded archive here.
Now Blynk is integrated into your Arduino IDE, but you don't yet have the app that goes with it on your smartphone. To change that, download
the app from your app store, depending on your operating system, or go to http://www.blynk.cc/getting-started/ and follow the link there.
Open the app. You are greeted with the two options Login and Create New Account. Create a new account. For this, you don't have to do anything
more than enter an email address and a password. Then you can log in.
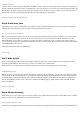
In order to get the interface for today on your smartphone, there's an exceptionally practical function in the app. Tap the icon at the top right
that's between the plus and the i. A QR code scanner opens, which you simply have to hold on the following picture. The interface already
appears on your device.
The QR code for today's project
Next, you have to tap the hexagonal icon at the top right and write down the code that's under AUTH TOKEN or, an option that's especially
practical, have it sent to your email address. You see, this code belongs in the Arduino programme.
First you have to download today's Arduino programme from the website www.iot.fkainka.de and open it in the Arduino IDE. Then, just like
yesterday, you have to enter the WLAN data at the top in the programme after "SSID" and "PASSWORD." You also have to enter the code referred
to above after the keyword "token." Only then can you load the programme on the NanoESP. After the upload, you can follow a couple of
messages on the serial monitor and thus make sure that the connection set-up has worked.
Now back to the smartphone or tablet. Start your interface by tapping on the Play button at the top right. You can now press the button in the
middle of your interface, and whenever you touch the button, the LED lights up on the breadboard. As a test, you can change the button type;
stop the programme by pressing the Stop button and tap briefly on the button. There change the button type from Push to Switch; then press Play