
User manual
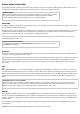

The variables bright_r, bright_g and bright_b store the PWM brightness values of the three colour components, the variables step_r, step_g and
step_b the step widths in which the PWM values are changed. In this way, the variables switch between +5 and -5.
In the first 20 steps, the red component is reduced stepwise from 100 to 0 and the green component simultaneously increased from 0 to 100,
whereby various mixed colours between red and green arise. After that, the signs of the two step values are reversed; the green component is
reduced and thereby the blue component is increased. In the last loop, blue is then reduced again and red increased. Then the infinite loop
starts again from the top. In all, 60 different colours can be seen.
Day 7
Today on the Advent calendar
• Clay
• 20-Mohm resistor (red-black-blue)
• Bare jumper wire
The jumper wire is needed for various experiments. Have a pair of wire cutters handy so that you can cut off the suitable wire pieces.
Switching LED with clay sensor
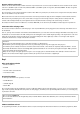
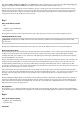
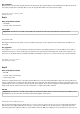
Components: 1xbreadboard, 1xred LED, 1x220-ohm resistor (red-red-brown), 1x20-Mohm resistor (red-black-blue), 4xconnection cable,
2xclay contact
The right clay contact (labelled in the image with a minus sign) is the earth contact. Always hold this one in your hand during the test.
How sensor contacts work
The pin switched as input is connected through an extremely high-ohmic resistor (20 Mohm) to +3.3V, so that a signal, weak but clearly defined
as High, is present. A human who is not currently hovering in mid-air is always earthed and provides a Low level through the electrically
conductive skin. If this person touches a sensor contact, the weak High signal is masked by the significantly stronger Low level of the fingertips
and draws the GPIO pin to the Low level.
However, how high the resistance between hand and earth actually is depends on many factors, including shoes and floor. The connection to the
earthing of the ground is best when one is barefoot in the wet grass, but it usually functions well on stone floors, too. Wood floors are more
strongly insulating; synthetic floorings are often even positively charged. So that the circuit always works, there is – similar to the case with
sensor buttons on lifts and doors – also an earth contact installed on the breadboard for every circuit. If one touches this and the actual sensor at
the same time, the earth connection is created in every case.
Clay conducts current about as well as human skin does. It can easily be put into any form desired and a clay contact feels much better than a
simple piece of wire. The surface with which the hand touches the contact is significantly larger. Thus, a "loose connection" is less likely to occur.
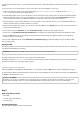
Cut a piece of the bare jumper wire around 10cm long and stick in a piece of clay. Insert the other end, as shown in the figure, into the
breadboard.
Because Snap4Arduino always switches on the pulldown resistors built into the Arduino, digital inputs are always drawn down to 0 and have a
Low level even without being touched. However, the Arduino also has analogue inputs that are very good for sensor contacts. Analogue inputs
deliver values between 0 (Low level) and 1023 (High level). The value 200 is a good limit value to differentiate between a sensor contact that is
being touched and one that is not being touched.
The programme
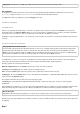
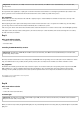
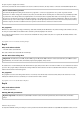
The programme 07knete01 switches the LED on when the clay contact is being touched and off again when it is released. The variable x always
shows the current value of analogue Pin5 on the platform. If it is lower than 200, the LED at digital Pin 7 is switched on; otherwise it is switched
off.
Day 8
Today on the Advent calendar
• 20-Mohm resistor (red-black-blue)
• Connection cable
Crab crawl