
User manual

Components: 1xbreadboard, 1xred LED, 1x green LED, 2x220-ohm resistor (red-red-brown), 3xconnection cable
The programme
For the projects on the Advent calendar, we use the easy-to-learn programming language Snap4Arduino. Download the current version at
s4a.cat/snap or simply use the file Snap4Arduino-aktuell.exe from the Downloads for the Advent Calendar.
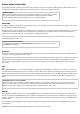
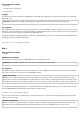
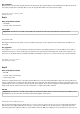
In Snap4Arduino, click on the Settings icon and select Language in the menu.
The Settings menu in Snap4Arduino
Select "English" in the list.
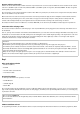
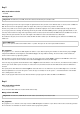
Before you can begin with the programming, a connection to the Arduino must be created. To do this, click on Arduino in the top left in the
block palette and then on Connect to Arduino. When you open a new programme in Snap4Arduino, the connection to the Arduino will often be
lost. Should an error occur when you start a new programme, reconnect the PC to the Arduino as described.
Snap4Arduino supports multiple Arduinos on one PC. As long as only one Arduino is connected, it is recognised immediately and the connection
is created.
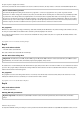
The connection to the Arduino was successfully created.
The programmes for the Advent calendar
You can download the programmes for the Advent calendar at www.buch.cd or simply put them together yourself each day using the figure.
Unzip the ZIP file from the download in a folder on the hard drive. Then click on the Files icon at the top left in Snap4Arduino and select
Import to import the programmes, which are in XML format, into Snap4Arduino. After the import, click once in the menu on Save. After that,
the programme is available in the software's own library, which can be reached through the Open menu item.
In Snap4Arduino, one does not need to type in any programme code when programming. The blocks are connected to each other simply via
drag-and-drop. The block palette in the left side of the window contains the available blocks, organised by themes.
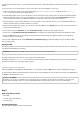
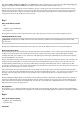
The first programme uses the most important blocks:
When green flag clicked on from the Control palette forms the start for most of the programmes.
continuing from the Control palette is an infinite loop that is constantly repeated.
wait... sec from the Control palette causes the program to wait a certain amount of time before the next step.
Set digital pin... to... from the Arduino palette sets one of the digital pins of the Arduino to a logical value true or false. These two values can be
found as blocks on the Operators palette.
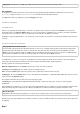
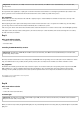
The programme starts when the user clicks on the green flag at the top right.
A continuing loop ensures that the two LEDs flash alternately indefinitely – until the user clicks on the red Stop icon at the top right in
Snap4Arduino.
After the LED at Pin 5 is switched on, 0.1 seconds elapses so that StandardFirmata does not "swallow" a command. A minimum wait time should
always be built in between the setting of two pins. After that, the LED at Pin 8 is switched off. Now the programme waits half a second.
Note: Decimal point
Snap4Arduino, like many American programmes, uses the point as the decimal separator, not the comma that is usual in Germany.
After that, in the same way, the LED at Pin 8 is switched on and the one at Pin 5 is switched off. After another half second, the cycle repeats from
the beginning.
Day 3