
User guide


39
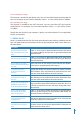
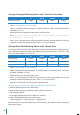
IN LUNCH RESUME DINNER RESUME OUT
(BREAK) (OUT) (OT) (DONE)
Monday-Friday 9:00am 12:30pm 1:30pm 6:00pm 7:30pm 10:30pm
Saturday 10:00am 1:30pm
• Click System Settings > Add Schedule
• Select a schedule code, for example “1” and describe it as “Office” and select the Work
Schedule as
Weekly.
• Define all the rules required for the normal working roster.
• Click
Save once done and it will bring you back to the main page where you can see
Schedule 1 being displayed onscreen. Click Close to save settings.
Setting Normal Working Roster with 2 Breaks without Overtime
• Click System Settings > Add Schedule
• Select a schedule code, for example “2” and describe it as “Office” and select the Work
Schedule as Weekly
• Define all the rules required for the normal working roster.
Note: For this type of schedule, go to Clocking Schedule > General > “Work time record into OT and Done
column considered as…,” please click “Normal work time (No OT is counted)”
• Click Save once done and it will bring you back to the main page where you can see
schedule 2 being displayed onscreen. Click Close to save settings.
Setting Flexi-Working Roster
For Flexi-Working Roster, there are no fixed times for checking in and out, employee in
flexi-working roster come to work at irregular time. This is how to configure flexi-work-
ing roster.
• Click
System Settings > Add Schedule
• Select a schedule code, for example “3” and describe it as “R&D” and select the Work
Schedule as Flexi
• Define all the rules required for the flexi-working roster.
• Click “Save” once done and it will bring you back to the main page where you can see
schedule 3 being displayed onscreen. Click
Close to save settings.