
Instruction manual


7
Dangerous voltages capable of causing death are some-
times present in this instrument. Before installation or
beginning any troubleshooting procedures, the power to all
equipment must be switched off and isolated. Units suspected of
b
eing faulty must be disconnected and removed to a properly
equipped workshop for testing and repair. Component replace-
ment and internal adjustments must be made by a qualified main-
tenance person only.
This instrument is protected throughout by double insula-
tion to minimize the possibility of fire or shock hazards,
do not expose this instrument to rain or excessive moisture.
Do not use this instrument in areas under hazardous con-
ditions such as excessive shock, vibration, dirt, moisture,
corrosive gases or oil. This control is not to be used in hazardous
locations as defined in Articles 500 and 505 of the National
Electrical Code. The ambient temperature of the area should not
exceed 122°F.
Remove stains from this instrument using a soft, dry
cloth. To avoid deformation or discoloration do not use
harsh chemicals, volatile solvent such as thinner, or strong deter-
gents to clean this instrument.
2–1 Unpacking
Upon receipt of the shipment, remove the unit from the carton
and inspect the unit for shipping damage.
If there is any damage due to transit, report it and file a claim
with the carrier. Write down the model number, serial number,
and date code for future reference when corresponding with
Tempco. The serial number (S/N) and date code (D/C) are
labeled on the box and the housing of the control.
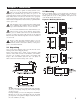
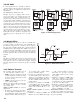
2–2 Mounting
R
emove mounting clamps or screws and insert the controller into
the panel cutout. Reinstall the mounting clamps or screws.
Gently tighten the screws or clamp until the front panel of the
controller fits snugly in the cutout.
Figure 2.1 Mounting Dimensions
Chapter 2 Installation
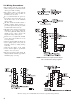
NOTE:
The TEC-9100 Series may be supplied with either mounting
screws (2) or mounting clamps (2). The mounting clamps
are the newer type.
In clamp mounting, to remove the clamps before installation
lift under one of the edges and pull up (un-peel). To install
just snap back on and push the clamps towards the front of
the control until they are snug.