
Operating instructions

M300USERSGUIDE SEA
GETTINGSTARTED
17
boot floppy. Don’t use boot directly into photon or probe for video modes at this time. Use
default settings for TCP/IP (no changes need).
10. With the 2010 CD, you have the option of installing TCP/IP 5.1. Check version and un-check
the earlier version of the TCP/IP 4.25.
11. After the install remove the CD and reboot. You should be able to login as root without a
password.
12. Follow instructions to create a new user with ID 101 (or greater) and group ID of 101 (See
“Adding User Accounts” on page 37).
13. Change the ‘/etc/group’ file to add the “sea” group with an ID if 101.
14. Exit root shell by typing exit at the main command prompt.
15. Login as the user just created.
16. Run Photon from a user shell by typing ph at the command prompt. The first time you run
Photon, it will automatically run the video configuration utility. Pick the highest resolution
possible with 8 or 16 bit color.
17. Exit Photon and wait a few seconds for the disk cache to empty and reboot the system. Just make
sure you can login again and run Photon (‘ph’) without any problems.
SETTINGUPQNXAFTERINSTALL
There are a few files that need to be modified and/or copied after the QNX install.
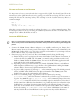
1. Copy the ‘/.licenses’ file from another node or edit the file to add all your licenses. Make sure you
backup this file first to ‘.licenses.bak’. Once this is done, check that the licenses have been
registered by typing licinfo -a at the command prompt. This will list all of the licenses
available under for each QNX package (see example below). The number next to each package
indicates how many licenses have been found. All QNX systems should have the same ‘/.licenses’
file and should contain ALL licenses for ALL machines.
upg 0/0
dejav 0/0
vgerx 0/1
vger 0/4
tcptk 0/2
phab 0/1
wcc 1/1 1
vedit 1/2 1
tcprt 2/17 1 16
phrt 0/15
qnx 0/17
2. Copy/modify the ‘/.profile’, ‘/.kshrc’ and ‘/etc/profile’ to match the files from another system.
Use a floppy to copy these files from another system.
3. You should use the same ‘/etc/group’ and ‘/etc/passwd’ files for all QNX systems. You can use a
floppy to copy these. This step should only be done after the system is totally installed and
everything is working okay.