
User manual


Connect Tech Blue Heat/Net User Manual
Revision 0.17 11
Hardware Installation
Connecting the Blue Heat/Net to your Network:
Before you begin, take a minute to ensure that your package includes the required components
that should have shipped with your Blue Heat/Net.
•
One Blue Heat/Net unit
•
One power supply
•
One CD containing software and documentation
•
One Quick Start Guide
•
One Phoenix contact screw terminal plug ( two port PoE models)
•
One RJ-45 cable (optional)
•
One DB-9 female to DB-9 female null modem cable (optional)
If any of these components are missing, contact us or your reseller.
NOTE: The Blue Heat/Net two port model features an
MDI/MDI-X Auto detect feature. The pinouts will adjust
automatically to accommodate the use of a null Ethernet cable
or a straight through cable.
Direct Connect
Direct connect is an Ethernet connection made directly from Blue Heat/Net to the Ethernet jack
on your computer.
This connection is achieved using a cross-wired Ethernet cable, also known as a null
Ethernet cable. These cables can be assembled yourself (see Typical RS-232 null modem
connection for pinouts) or purchased from any electronics or computer store.
Connecting to the Network
The most common method involves connecting your Blue Heat/Net to network hardware at the
facility where you are installing the Blue Heat/Net device. The hub or switch could be in a
network closet in your building, or locally on your desk or workbench. This connection is
achieved using a straight through Ethernet cable; a standard Ethernet cable readily available
from any electronics or computer store.
NOTE: Connect Tech recommends you use quality Category
5 cables or better when connecting to the Blue Heat/Net
Ethernet jack.
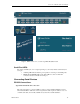
Ethernet LEDs
On four and eight port Blue Heat/Net models, the front panel features Ethernet and Serial Port
LEDs to monitor activity. The left front side of the box features five LEDs. Two port models
feature the CPU LED on the face of the device between the two serial port LEDs. The 10/100
and Link/Activity (L/A) indicators are located on the top). Their usage is as follows:
Power: When this LED is on, the Blue Heat/Net is receiving line power (some models
do not have this LED).
CPU: Once the uClinux firmware is booted and running correctly, this LED appears as
a continuous light.
10/100: This LED represents the speed at which the Blue Heat is connected to your
Network.
LED on = a 100 megabit connection.