
Installation Instructions


8
1-877-742-3071
www.connectadock.com
1501OwnerAvenue,Atlantic,IA50022USA
1-877-742-3071
www.connectadock.com
1501OwnerAvenue,Atlantic,IA50022USA
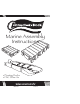
2000 Series (HP) Extra Flotation
Instructions for:
Extra Flotation (EF2020)
2 or more people are needed for installation
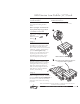
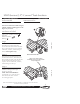
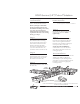
Step 1
When installing a 2000 Series
Extra Flotation to an existing
dock, two Float Sections need
to be removed from the water.
Start by unbolting the Float
Connectors from Float Section
(1a). Place Float Section (1a)
out of the water in location (1b).
Step 2
Unbolt the Float Connectors
from the main dock section (2a).
Place Float Section (2a) out of
the water in location (2b).
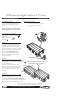
Step 3
Insert Extra Flotation under Float
Section (2b).
Step 4
Reattach Float Section (1b) to (2b)
with Float Connectors (hand
tighten only).
Step 5
Place Float Section (1b & 2b) into
the water and reattach to the main
dock section. Tighten all bolts in
the dock using 25 lbs/ft (3.46 kg/m)
of torque. Anchor as desired.
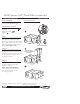
NOTE: DO NOT SUBMERGE...
a minimum of 3” (7.62 cm) must
show above the water surface for
venting purposes.
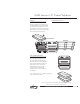
Recommendation
Use 2000 Series Extra Flotation to add
300 lbs (136.08 kg) of buoyancy
and stability to your floating docks
and where excessive weight is placed.
Examples: Under heavy gangway
or storage boxes.
Tools Needed
9/16“ (16 mm) Socket wrench
Before you begin: Determine
the layout and location of your
dock. When installing a new dock,
it is easier to insert the Extra
Flotation before the Float Section
is placed in the water. For existing
docks, go to step 1.
Extra Flotation
Extra
Flotation
1a
2a
2b
1b
3
4 5
Note: Check all bolts every three months or as needed to insure all connector
hardware is securely fastened.