
Installation Instructions


40
1-877-742-3071
www.connectadock.com
1501OwnerAvenue,Atlantic,IA50022USA
1-877-742-3071
www.connectadock.com
1501OwnerAvenue,Atlantic,IA50022USA
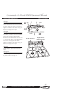
Connect-A-Port Floating Dock Attachment
Instructions for:
Connect-A-Port (CAP0001)
Connect-A-Port 2XL (CAP002)
Floating Dock (AKH2000)
1
2
3
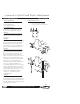
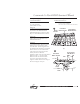
Step 1
Center Pivot Pin in Small Hinge Bracket
and drill thru the Pivot Pin with 1/4”
(6.5 mm).
Tools Needed
(1) Drill - 1/4” (6.5 mm) & 7/16“
(11 mm) drill bit
(1) 3/4” (18 mm) Wrench
(2) 9/16” Wrenches
Step 2
Attach the two Small Hinge Brackets
to the front of the port. Turn the hinge
part up or down depending on how
high your dock is off the water. Use
the 1/2” (12 mm) bolt and lock
washer (25ft/lbs)(3.46 kg/m)
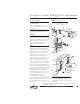
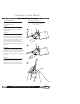
Step 3
(a) Attach one Large Hinge Bracket
with Pivot Pin to the Small Hinge
Bracket. Then algin the Large Hinge
Bracket with dock to determine bolt
hole location. If you are on a very
high dock there is an extension plate
available to accommodate your
situation. You may want to put your
PWC on the port at this time to see
how it makes the float set in the
water, if the entrance end of the port
is high with the craft on it you will
want to raise the front of the port to
give is a slight down hill appearance
for easy roll off. Remember, if it rolls
off to hard the mount is too low, rolls
off too easy you are too high.(b)
Mark holes. Drill with 7/16” (11 mm)
bit. 3/8” (9 mm) bolts, washers and
lock washer not supplied.
Recommended 4 to 6 mounting
holes. Mount the Large Port Bracket
to the dock and attach port hinge and
secure with Pivot Pin. Repeat on next
bracket.
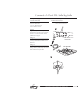
Step 4
(a)Algin hinge point of port and dock.
(b) Insert Pivot Pin with the 1/4” 6.5
mm) hole up. (c) Secure Pivot Pin with
cotter pin.
Note: If mouting port to wooden floating dock use 3/8” (9 mm)
Lag Bolts (screw based)
(a)
(b)
Port
4
(a)
(b)
(c)
Not available in metric