
Installation Instructions

10
1-877-742-3071
www.connectadock.com
1501OwnerAvenue,Atlantic,IA50022USA
1-877-742-3071
www.connectadock.com
1501OwnerAvenue,Atlantic,IA50022USA
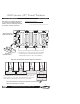
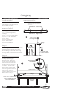
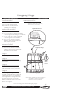
2000 Series High Profile Utility Channel
Instructions for:
Utility Channel (UT2024),
(UT2048), (UTC2048)
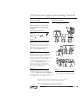
Tools Needed
9/16” (16 mm) Socket wrench
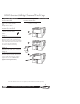
Step 1
Install Float Connectors into all
Float Section sockets where Utility
Channel Sections will be attached.
Secure Float Connectors into sockets
with bolts, washers, and bushings
provided (hand tighten only).
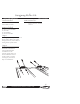
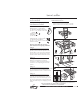
Step 2
Female end of Utility Channel points in
direction adding sections. Add Utility
Channel by placing it over the Float
Connectors, shift your body weight to the
Utility Channel and hook into place.
Secure with bolts, washers, and
bushings. (hand tighten only) Secure
with bolts, washers, and bushings.
Remove lid and set aside. Continue
adding Utility Channel floats.
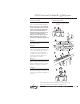
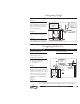
Step 3
Tighten all bolts in the dock using
25 lbs/ft (3.46 kg/m) of torque. Anchor
as desired. NOTE: DO NOT SUBMERGE...
a minimum of 3” (7.62 cm) must show above
the water surface for venting purposes.
Step 4
Insert lid starting with last Utility
Channel placed. Tighten per Step 3
Before you begin: Determine the
layout and location of your utility
channel.
1
2
4
Note: Check all bolts every three months or as needed to
insure all connector hardware is securely fastened.
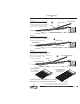
Hardware Included
3/8” x 1-1/4” (10 mm x 35 mm)
Hex bolts
Diamond washers
Bushings
FOR SAFE INSTALLATION AND OPERATION - All utilities conduit
needs to meet all state and local utilities construction codes