
Installation Instructions

18
1-877-742-3071
www.connectadock.com
1501OwnerAvenue,Atlantic,IA50022USA
1-877-742-3071
www.connectadock.com
1501OwnerAvenue,Atlantic,IA50022USA
Swim Ladder
Note: Check all bolts every three months or as needed to
insure all connector hardware is securely fastened.
Instructions for:
Swim Ladder (SL1020), (SL1020M)
1000 Finishing Connector (FC1000), (FC1000M)
2000 Versatile Connector (VC2000), (VC2000M)
Tools Needed
3/8” Socket wrench (16 mm) (2000 Series)
Warning: Swim Ladder does not float—
tether to dock before beginning installation.
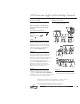
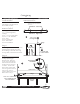
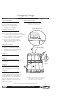
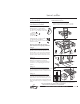
Step 1
With the Swim Ladder in an upright
position, place the bracket portion of the
Swim Ladder on an outer edge of the Float
Section (as shown). Align the holes in the
bracket with the holes in the Float Section.
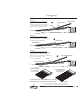
Step 2
Holding the Swim Ladder in place, insert
bushings and 1000 Series Finishing
Connectors or 2000 Versatile Connectors
into the two corresponding Float Section
sockets.
Step 3
Insert bolts and washers into appropriate holes
on each side of the Swim Ladder bracket.
Tighten with allen wrench or socket wrench.
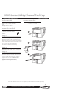
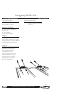
Step 4
Slide adjustable steps of Swim Ladder down
into water and hook the bottom of step on
depth stop to achieve desired length. (Note:
The catch at the bottom of Swim Ladder will
keep adjustable steps from dropping off into
water.)
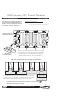
Hardware Included
(2) 1000 Series Finishing Connectors
(2) 3/8” x 1-3/4” (10 mm x 44.45 mm)
cap bolts
(2) Round washers
(2) Bushings
(1) Allen wrench
1000 Series—Low Profile
2000 Series—High Profile
(2) 2000 Versatile Connectors
(2) 3/8” x 1-1/4” (10 mm x 35 mm) Hex bolts
(2) Round washers
Recommendation: To add more stability at the Swim
Ladder, use Extra Flotation under Float Section.
1
2
3
4
Depth stop
Dock
Steps
Ladder
Catch
2000
Series
2000
Series
1000
Series
2000
Series
2000
Series
1000 Series 1000 Series
Both 1000 Series & 2000 Series hardware is included